
At my work, we store hundreds of thousands of block-level backups for our customers. Since our customer base is mostly Windows focused, most of these backups are copies of NTFS file systems. As of today, we’re not performing any data deduplication on these backups, which is pretty crazy considering that how well you’d think a Windows OS will probably dedup.
So I started on a journey to attempt to dedup NTFS. This blog post briefly describes my journey and thoughts, but also introduces a tool called fsdup I developed as part of a 3 week proof-of-concept. Please note that while the tool works, it’s highly experimental and should not be used in production!
Content
0. Link to the fsdup tool
If you’re impatient, here’s a link to the fsdup tool I created as part of this proof-of-concept.
1. Thoughts on NTFS deduping
1.1. The obvious approach
The obvious approach to dedup NTFS would be to simply dedup blocks (= clusters), so typically that would mean deduping with a fixed offset of 4096 bytes (4K cluster size). While that will lead to the best dedup results, it also produces a lot of metadata and the metadata-to-data ratio (metadata overhead) is pretty bad. In addition to that, the more chunks you produce the higher the chance of hash collisions (unless you increase the hash size, which in turn increases the metadata overhead …). On top of that, many object stores or file systems are not really good with small files like that, so a higher chunk size is desirable.
That said, given that we’re talking about hundreds of thousands (maybe even millions? I should really check …) of NTFS file systems, it might not matter if the objects are 4K or 128K in size.
1.2. What I did instead
Since this was a proof-of-concept, and I wanted to learn about NTFS and write some fun Go code, I chose to go a different route:
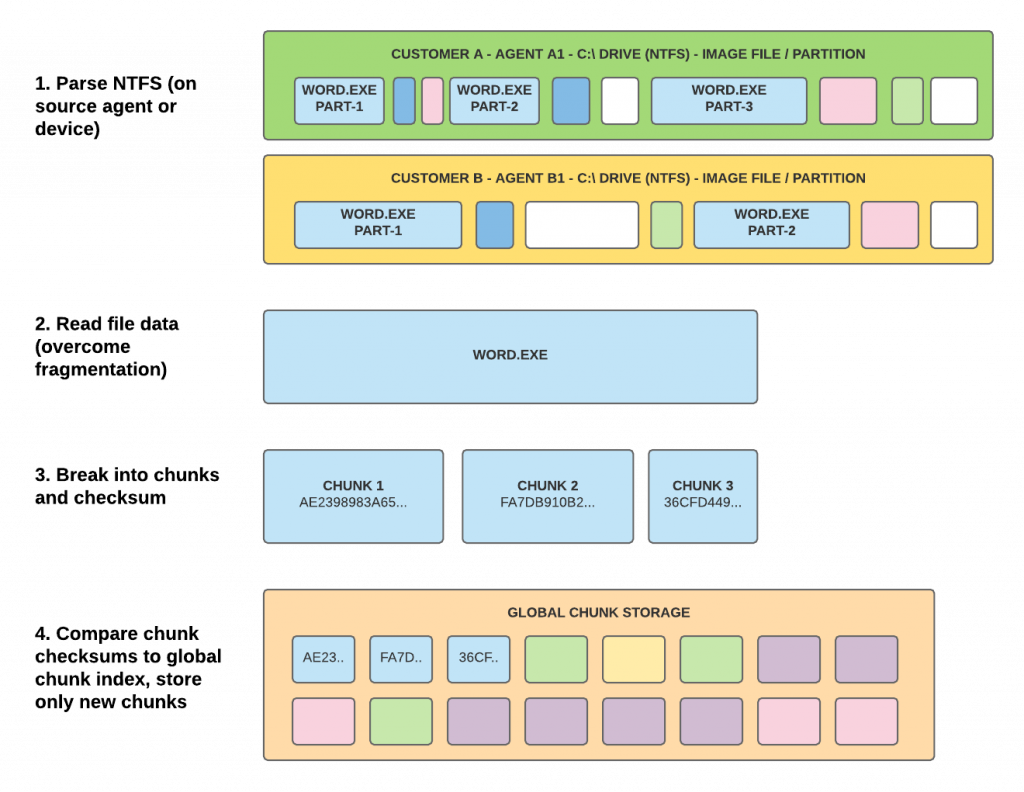
Instead of fixed offset chunking with 4K chunks, I decided to parse the NTFS filesystem using a combination of content aware chunking (for the file system itself) and fixed offset chunking (for the files within the file system).
Here’s my approach:
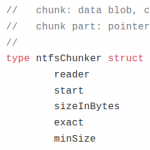
- Index files within NTFS: Read all entries in the master file table ($MFT) that are larger than X (e.g. 128K, 2M, …). For each entry, read all data runs (extents, fragments) sequentially (i.e. re-assmble the file). Break the re-assembled file into max. 32M sized chunks and then hash each chunk using blake2b. For each chunk checksum, compare if it’s in the global chunk index and only store new chunks.
- Index empty space: Read the NTFS bitmap ($Bitmap), find unused sections and mark them as sparse. This step is optional. If it is used, the re-assembled file system will likely not be identical as the original one, because unused space is rarely ever filled with zeros. However, the space savings due to this step are enormous and the user won’t care.
- Find gaps: All sections of the file system that are not covered by step 1 or 2 are stored in gap chunks. This typically includes all files smaller than X (see above).
The algorithm will create a manifest file for every NTFS file system which can later be used to re-create it from scratch, either by exporting it from the global chunk store, or by mapping it to a drive or mountpoint.
Here’s a (simplified) diagram showing (mostly) step one:
2. fsdup: A tool to dedup NTFS
So to prove that the method above works, I created a small tool called fsdup. It implements the algorithm above, and also provides ways to re-assemble deduped file systems or expose them as mapped drives. Here’s the current feature set:
- fsdup index: Index/dedup NTFS file systems into a chunk index (stored locally or in Ceph). This creates a manifest file to describe the chunks that make up a file system.
- fsdup export: Using a manifest and a chunk index, this command re-assembles a file system into an image file. This is the reverse of the index command.
- fsdup map: Using a manifest and a chunk index, this command exposes a block device of the block device that was indexed using the index command. This command is super useful for booting VMs directly of off a chunk store.
2.1. Indexing
First, let’s dedup the NTFS file system by breaking it into chunks using the approach described above: The fsdup index command takes two arguments, an input file system (block device or file), as well as an output file (a manifest that describes what chunks the input file consists of). In this example, we assume that the NTFS file system is in a file called Cdrive.img.
|
1 2 3 4 5 6 7 8 9 10 11 12 13 14 15 16 17 18 19 20 21 22 23 |
# Deduplicates file, creates chunk index, generates Cdrive.manifest. # By default, this will index files >128k and use a local folder "index" as chunk store. $ fsdup index Cdrive.img Cdrive.manifest Detected MBR disk NTFS partition of size 249.0 MB found at offset 1048576 Indexed 52.2 MB in 9 file(s) (147 skipped) Indexed 195.6 MB of unused space Indexed 1.2 MB of gaps (21 chunk(s)) NTFS partition successfully indexed Indexed 1.0 MB of gaps (1 chunk(s)) MBR disk fully indexed # Alternatively, Ceph can be used as chunk store, and the default parameters can be overriden $ fsdup index -minsize 2M -store 'ceph:?pool=fsdup2m' Cdrive.img Cdrive.manifest ... # Prints the manifest $ fsdup print Cdrive.manifest diskoff 000000 - 196608 len 196608 chunk a4bfc70 chunkoff 0 - 196608 diskoff 196608 - 288832 len 9092224 sparse diskoff 288832 - 759872 len 471040 chunk 8976c52 chunkoff 0 - 471040 diskoff 759872 - 981256 len 28282 chunk beef1da chunkoff 28282 - 61040 ... |
The main deduplication algorithm described above is codified in the chunker_ntfs.go file. The top of the file also describes the above mentioned approach. Feel free to poke around and leave comments.
Please be reminded that this is a proof-of-concept. The algorithm is not optimized at all. In particular, it does not do a good job reading the file system sequentially (see section “Thoughts” below), meaning that it’s particularly slow on spinning disks. It wouldn’t be hard to rewrite it to work (more) sequentially though.
2.2. Exporting and mapping
Once indexed, the file system can be exported from the chunk store, or mapped to a local mountpoint using the manifest we created with the index command. These operations can be done with the fsdup export and fsdup map commands.
|
1 2 3 4 5 6 7 8 9 |
# Creates an image file from chunk index using the manifest $ fsdup export Cdrive.manifest Cdrive.img # Alternatively, if Ceph was used as a chunk store, you have to specify the pool $ fsdup export -store 'ceph:?pool=fsdup2m' Cdrive.manifest Cdrive.img # Creates a block device /dev/nbdX that allows reading/writing the image file without exporting it. # The second parameter is a copy-on-write file which is used as target for write operations. $ fsdup map Cdrive.manifest Cdrive.cow |
The fsdup map command is super useful for booting VMs directly from the deduplicated chunk index in Ceph/RADOS. That eliminates wait times for exporting/re-assembling the image. One could, for instance, boot the VM like this:
|
1 2 |
$ fsdup map Cdrive.manifest Cdrive.cow # maps to /dev/nbd0 $ kvm -drive format=raw,file=/dev/nbd0 -serial stdio -m 4G -cpu host -smp 2 |
Please note: The fsdup map command is really really experimental and as of now super inefficient: Regardless of the size of the a read/write request, the command reads the entire 32M chunk from the global chunk store and writes it to a cache and the copy-on-write file (here: Cdrive.cow). Don’t judge: It was really easy to implement and I was planning to optimize it later. In practice, this means that until the relevant sections have been written to the local copy-on-write file, reads and writes will be slow and your Windows OS may feel sluggish.
3. Experiments
I did some preliminary experiments with 126 production NTFS file systems, totalling 53.5 TB in size, with 16.2 TB used space on disk. The goal of the experiments was to maximize the dedup ratio and the space reduction percentage. As a reminder, here’s how they are defined (for a detailed description, check out my Master’s thesis):
 |
 |
Disclaimer: This is a very small sample so results might vary quite significantly with more input data. Also, please note that these experiments only measure the dedup ratio and space reduction. They do not take indexing performance or compression into account, which can have tremendous impact on the overall space savings or speed.
Experiments:
- Dedup with fsdup index -minsize 2M
- Dedup with fsdup index -nowrite -minsize 128k
- Dedup with fsdup index -nowrite -minsize 64k
- Dedup with fsdup index -nowrite -minsize 8k
-minsize X defines the minimum file size to be indexed
-nowrite means to not actually write the chunk index, i.e. only create a manifest file.
Experiments 2-4 were performed without actually writing out the chunk index, which is not actually necessary to calculate the dedup ratio and space reduction.
3.1. Experiment 1: Minimum file size 2M
|
1 2 3 4 5 6 7 8 9 10 |
$ fsdup stat *.manifest Manifests: 126 Number of unique chunks: 3,860,409 Total image size: 53.5 TB (58853137407488 bytes) Total used size: 16.2 TB (17782383914496 bytes) Total sparse size: 37.4 TB (41070753492992 bytes) Total chunk size: 11.6 TB (12751789303491 bytes) Average chunk size: 3.2 MB (3303222 bytes) Dedup ratio: 1.4 : 1 Space reduction ratio: 28.3 % |
3.2. Experiment 2: Minimum file size 128k
|
1 2 3 4 5 6 7 8 9 10 |
$ fsdup stat *.manifest Manifests: 126 Number of unique chunks: 8,660,507 Total image size: 53.5 TB (58853137407488 bytes) Total used size: 16.2 TB (17782383914496 bytes) Total sparse size: 37.4 TB (41070753492992 bytes) Total chunk size: 10.8 TB (11887333358175 bytes) Average chunk size: 1.3 MB (1372591 bytes) Dedup ratio: 1.5 : 1 Space reduction ratio: 33.2 % |
3.3. Experiment 3: Minimum file size 64k
|
1 2 3 4 5 6 7 8 9 10 |
$ fsdup stat *.manifest Manifests: 126 Number of unique chunks: 10,729,245 Total image size: 53.5 TB (58853137407488 bytes) Total used size: 16.2 TB (17782383914496 bytes) Total sparse size: 37.4 TB (41070753492992 bytes) Total chunk size: 10.7 TB (11811050790919 bytes) Average chunk size: 1.0 MB (1100828 bytes) Dedup ratio: 1.5 : 1 Space reduction ratio: 33.6 % |
3.4. Experiment 4: Minimum file size 8k
|
1 2 3 4 5 6 7 8 9 10 |
$ fsdup stat *.manifest Manifests: 126 Number of unique chunks: 17,831,801 Total image size: 53.5 TB (58853137407488 bytes) Total on disk size: 16.2 TB (17782383914496 bytes) Total sparse size: 37.4 TB (41070753492992 bytes) Total chunk size: 10.6 TB (11699232512973 bytes) Average chunk size: 640.7 KB (656088 bytes) Dedup ratio: 1.5 : 1 Space reduction ratio: 34.2 % |
4. Thoughts
4.1. Results
While these results are pretty good, I was a little disappointed by the fact that I could only get 33% space savings across so many Windows installations. It could be the sample size, or it could be the fact that people store more user-specific data than I thought they would, or it could be that I’m not excluding temporary files or large computer-specific files such as pagefile.sys or hiberfil.sys.
In any case, there is much more to be investigated and much more to be optimized. I am quite confident that I can get to much higher dedup ratios with a higher sample and a little more investigation time.
Too bad I don’t have more time right now. So this is it for now. Or is it?
4.2. Further experiments
Since I wasn’t satisfied with the results, I informally continued the experiments in a less structured way. I picked 128k as a minimum file size, because that seems good enough, especially since 64k and 8k were so much slower than 128k and 2M (not shown in the results).
In one experiment, I continued ingesting more NTFS image files (up to 195), and while the dedup ratio for a 128k min size shrunk a little (32.1%), I experimented with compressing the chunks individually before storing them. With the same dataset, i.e. 195 image files, I got the following results:
|
1 2 3 4 5 6 7 8 9 10 11 12 13 14 15 16 17 |
$ fsdup stat *.manifest Manifests: 195 Number of unique chunks: 13001394 Total image size: 70.1 TB (77086756862464 bytes) - Used: 23.6 TB (25972460016504 bytes) - Sparse/empty: 46.5 TB (51114296845960 bytes) Total chunk size: 16.0 TB (17644694259014 bytes) Average chunk size: 1.3 MB (1357139 bytes) Median chunk size: 92.6 KB (94845 bytes) Dedup ratio: 1.5 : 1 Space reduction: 32.1 % Stats after compression (Ceph/gzip): Total size of image files: 23.6 TB (no compression) Total size of chunks (in Ceph/gzip): 10.0 TB (deduped in Ceph with gzipped chunks) Dedup ratio (raw vs Ceph/gzip): 2.36 : 1 (-57.6 %) |
As you can see, compression is a real game changer (obviously). We now get 57% space savings!
Now the obvious question is: What if I simply compress the original image files with gzip? Will that not lead to similar savings? Good question, my dear reader! I have, unfortunately, not done any tests with purely compressing image files using gzip.
I do, however, have at least some numbers with regards to this: Storing these 195 image files on ZFS with lz4 compression takes up about 17 TB of space, so that’s a ratio of 1.38 : 1 (23.6 : 17), which is obviously much worse than Ceph+gzip, but it also doesn’t really say anything because it’s not an apples-to-apples kind of comparison.
Maybe I’ll eventually find the time to continue the experiments … Who knows.
4.2. Interesting things I’ve learned
Besides the results of the experiments, I’ve learned quite a few things, which I thought I’d share with you.
4.2.1. Parsing NTFS is hard
Who would have thought that a simple file system could be so complicated. When I started this, I briefly looked for Go libraries to parse NTFS and I found go-ntfs, which works wonderfully, but had a super awkward interface, and it simply didn’t fit my needs. What I needed was the boundaries for all extents (data runs) for all files greater than X bytes — not something the library provided. I then briefly looked into using ntfs-3g and use cgo as an interface to use it in Go. That turned out to be tedious (maybe because I had never used cgo before? maybe because ntfs-3g is hardly documented at all?), so I didn’t go that route either.
Long story short, I decided to write my own parser. How hard could it be?
Turns out, it’s not terribly hard to read the sector size, the cluster size and other basic information from the NTFS boot sector. Getting from the boot sector to the $MFT and then iterating over all entries was also manageable. Once I had a file entry though, NTFS has these strange data runs (extends, fragments) that are terribly hard to parse. Once you know how to read little endian ints (signed and unsigned!), it’s all super easy, but getting there was quite the challenge.
Oh, and then there is this thing called NTFS fixups (also called update sequences) which replaces bytes at the end of each MFT entry as a means to detect errors. What crazy madness is this?
The one resource I can highly recommend for anything NTFS is Richard Russon’s NTFS documentation, a great reference for all the weird things that NTFS does and doesn’t do. I particularly enjoyed his writing style. Here’s a gem from the section about $Bitmap parsing:
“The backup copy of the boot sector lies in this no-mans-land the cluster is hence marked as in use.
In theory, on very small volume, this attribute could be resident. In practice, Windows crashes.”
Another resource I highly recommend is the Active Disk Editor, a wonderful colored hex editor that is really good at displaying NTFS sectors, MFT entries and data runs. It only worked properly on Windows, but it was worth it working in a VM. Without it, I would not have succeeded.
Anyway. What I learned was this: Don’t write your own NTFS parser. Use someone else’s! I should have spent more time with ntfs-3g and cgo. Or just written this part in C.
4.2.2. I got better at Go
Which brings me to this. Part of why I wrote this in Go is to get better at Go. I think I did. I know how to structure things and I’m generally more confident with the language. Yeyy!
4.2.3. Random access on HDDs is sloowww ….
As of its current iteration, fsdup doesn’t do a great job to read the disk (file system) sequentially. It does this instead: Read MFT entry, read data runs, read each data run from disk. Since the MFT is (usually) at the beginning of the disk and the data runs are spread out all over the place (the more fragmented the file system the more spread out they are), the read head has to jump back and forth a lot.
That’s slow! Yes, I know. It’s obvious. I knew random access on HDDs was slow, but I didn’t know how much of a difference it made. Well now I know.
The indexing/chunking algorithm can be optimized for (mostly) sequential reads though pretty easily. I haven’t done this yet, but here’s how I’d do it if I had more time: Read all entries in the MFT, sort by first data run offset, then read each MFT entry like above.
Assuming that most file entries fit in one data run, and that the file system is not horribly fragmented, that approach should read the disk mostly sequentially.
5. What now?
So what now? Well right now, I am not working on this anymore, but I suspect that I will in the near future. I’ll probably experiment with file exclusion for temporary files and files like pagefile.sys. I’ll also try to get some file size histograms so I can get some data about what a good min size will be.
In addition to that, I might try to use the simple 4K approach, i.e. simply dedup blocks/clusters instead of all this mumbo-jumbo with the files. If I find a good data store to support this many objects without much overhead, why not, right?
I also need to investigate and find a way to fit compression into this concept. The current implementation gzips the chunks before storing them, which is great for writing, but not great for random access reading of partial chunks (think: get me bytes 1024-2048 from chunk 1234), because gzip is not really easily seekable. Not great.
So there’s lots to do and no time to do it. Isn’t that what it always feels like?
Thanks for reading. Feel free to leave comments. I love conversing about this!
Recent Comments