
Anyone that’s ever managed a few dozen or hundreds of physical servers knows how hard it can become to keep all of them up-to-date with security updates, or in general to keep them in sync with their configuration and state. Sysadmins typically solve this problem with Puppet, or Salt or by putting applications in a container. While those are great options if you control your environment, they are less applicable when you think about other cases (such as appliance/server that doesn’t reside in your infrastructure). On top of that, replacing the kernel, major distribution upgrades or any larger upgrades that require a reboot are not covered by these solutions.
Being faced with this problem for work, we started exploring alternative options and came up with something that has worked reliably for almost two years for a fleet of now over 80,000 devices. In this blog post, I’d like to talk about how we solved this problem using images, loop devices and lots of Grub-magic. If you’d like to know more, keep reading.
to the
Content
1. Debian packages all the way?
Our BCDR appliance has always been Ubuntu-based, so the natural way to update our software was through Debian packages. That’s what we did for a long time: every two weeks, we’d build releases for Ubuntu 10.04/12.04 (yes, we know, read on!) and after thoroughly testing them, we’d ship those to the fleet.
That worked for a long time, but it had some significant drawbacks:
- Updating third party dependencies: Having a few Debian packages implies that you are really just taking responsibility for your own software and not for other software on the appliance. Managing updates for Apache, Samba, libc or even PHP is non-trivial when all you have available is your own something.deb. Given that my employer sells the entire appliance, we of course have to take responsibility for the entire stack, especially when you think about security patches for third party software.
- Service restarts / reboots: The dependency problem becomes particularly tricky with major updates that require service restarts or even reboots. Of course, Debian packages are supposed to handle service restarts themselves, but in reality not all of them do that gracefully. And as soon as you get into reboot-territory (for things like kernel upgrades), you need to make sure that you’re not interrupting important device tasks (backups, virtualizations, …), and you have to make sure that your device actually comes back up (not as easy as you think, see below!).
- Distribution upgrades: Now when it really becomes tricky is when the entire OS version needs to be moved forward. Upgrading from Ubuntu 10.04 to 16.04 using just apt-get dist-upgrade and the occasional reboot, for instance, will take incredibly long and many times will straight up not work (if you’ve ever used apt-get dist-upgrade, you’ll understand).
- Thousands of versions and states: With the Debian upgrade model, devices really behaved like normal computers: Right after they were freshly imaged and shipped out, everything was great and new, but the older they got the more the OS deteriorated — thereby leaving devices in vastly different states. Just to give you an idea: We had 40 different versions of VirtualBox on our devices (before we switched to KVM), 25 different ZFS versions and over 80 different Linux kernels!
That is by no means a complete list of problems, but I don’t want to bore you with even more problems. Let’s get to the fun part: How to solve it!
2. Images, not packages!
With all these problems it’s pretty obvious that we needed something better. We needed to manage the state and configuration for our devices. It was important to minimize the number of different device configurations/packages/versions in the fleet, and to ensure that with every upgrade, we’d be able to upgrade the entire stack — be it our own software, third party software, or even system libraries such as libc or the kernel.
2.1. Requirements
We started defining our requirements for a solution, and they were actually pretty short:
- All devices follow the same upgrade path. There is only one upgrade path.
- All devices can be upgraded this way (even older ones with small OS drives)
- Switching from one version to another is atomic (or as atomic as possible).
- Rolling back to a previous version is possible (if the upgrade fails).
The strongest implication of these requirements is of course that we were going to drop package based upgrades, and — if you can read between the lines — that rebooting an appliance as part of the upgrade process is acceptable.
Both of these are a pretty big deal. Big decisions were being made!
2.2. What are images anyway?
To be able to reduce the number of configurations, we decided that we wanted to stop treating our software and all its dependencies as separate pieces. Instead, we wanted to combine them all into a single deliverable — an image.
So what’s an image? An image (in our world) is an ext4 file system that contains everything needed to boot and run a BCDR appliance. That includes:
- The Ubuntu base operating system (kernel, system libraries, ..)
- Required third party tools and libraries (Apache, KVM, ZFS, …)
- The device software (dubbed IRIS by our marketing team)
Here’s a nice picture showing an example:
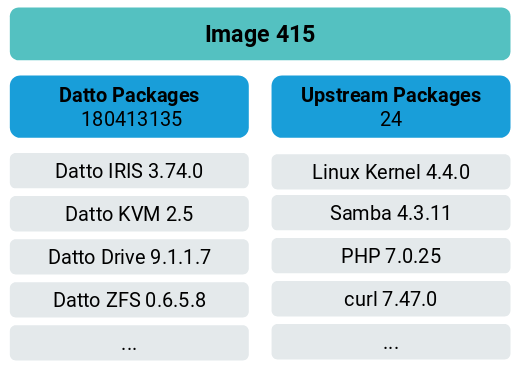
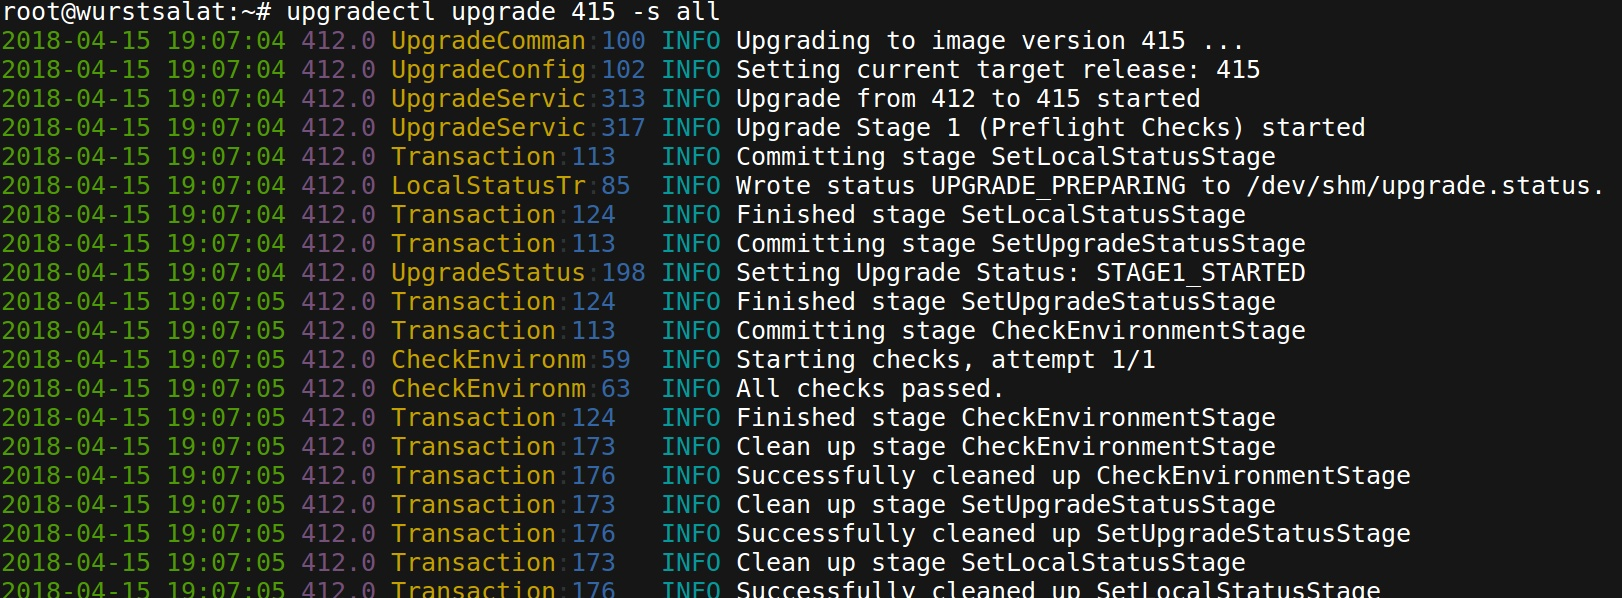
We were excited about this idea because with images there is exactly one number, the image version (415 in the picture above), that defines the version of every piece of software that is installed. No more testing our software with multiple ZFS versions, no more hoping that it’ll work with all KVM versions. Yey!
3. Image based upgrades (“IBU”)
After making all of these important decisions, we still needed to find a way to build, distribute and boot these images on our devices. So let’s dive into these topics.
3.1. Building an image
We typically build an image automatically every time we tag a new release (or release candidate): Every time we push a tag in Git, a CI worker starts the image build process. The build process itself is pretty interesting, but a little out of scope for this post. But I don’t want to leave you hanging so here is the short version:
We first build Debian packages of our own software and publish that to a Debian repository. We snapshot the Debian repository using aptly, and we do the same regularly with an upstream Ubuntu repository (“Upstream packages”). We then we use debootstrap to create a base Ubuntu system and install our software with all its dependencies in a chroot. Once that’s done, we tar it up and rsync it to our image server. On there, we extract the tarball and rsync it over the last image, which resides in a ZFS volume (zvol) formatted as ext4. After we zero out unused ext4 blocks, we finally snapshot the zvol containing the file system.
Here’s what that looks like on the image server:
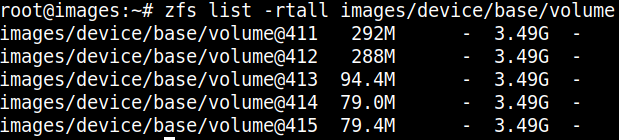
That zvol now contains the ext4 file system of our BCDR appliance. That is the image. That’s our single deliverable. It can be tested as one unit and once it passes QA it can be distributed to our customers’ BCDR devices.
3.2. Distributing the image
Great, now we’ve successfully built an image. How do we get it from our data centers to the >80k devices? Pretty simple: We use ZFS send/recv!
Our devices all have ZFS pools anyway to store their image based backups, and we already heavily use ZFS send/recv to offsite their backups. So using this technology in reverse was a no-brainer.
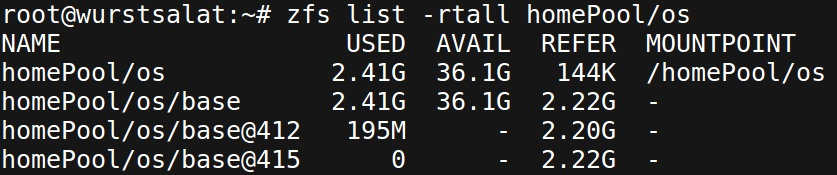
So here’s what we do: When it’s time to upgrade, we instruct a device to download a ZFS sendfile diff over HTTPS (we’d use ZFS send/recv over SSH directly but that cannot be cached unfortunately):

As you can see in the screenshot, we typically don’t have to download the full image, because the devices have upgraded before and already have a version of the image in their local pool. That’s pretty sweet: Using this technique, we can do differential operating system upgrades — meaning devices only have to download the changed blocks of the image.
That’s a win-win, because it means we don’t overuse our customers’ networks and we don’t have to provide lots of bandwidth for upgrades from our data centers.
Once the image is downloaded, we import it to the local ZFS pool. This is particularly important for the next upgrade (to ensure we can download diffs):
3.3. Booting the image
Now that we have the image, how do we boot into that file system? And if every image version we build is a completely fresh OS, how do we go from one version to the next?
3.3.1. ZFS-on-root, A/B partitions and A/B folders
Not surprisingly, there is more than one answer to these questions. There are many ways to use the image to produce a bootable system, so we had to experiment a little bit to find the best one.
Given that they are quite interesting, I thought I’d briefly mention them and why we didn’t end up doing them:
- ZFS-on-root with A/B datasets: We use ZFS pretty heavily for our image based backups, so we naturally thought we could also use it as the root file system of our appliance. The idea here was to distribute the image for the BCDR appliance as a ZFS dataset (not as zvol as described above), clone it and then directly boot into the ZFS clone. Since Grub supports reading ZFS in its newer versions and there’s also a ZFS initramfs module, ZFS-on-root is absolutely possible. To upgrade from one image to the next (i.e. one ZFS dataset to the next), we’d simply update the Grub config and reboot. It worked beautifully, but since booting into ZFS is pretty new, we didn’t feel like it was mature enough for our main product. Pass.
- Simple A/B partitions: Quite a few appliances and phones simply have two partitions, one with the current system and one with the next. This idea was straight forward: Download the new image, rsync it to the inactive partition, update Grub, and then reboot. The unfortunate thing here was that not all of our devices have spare space for an extra partition (not without repartitioning at least). We experimented (and succeeded) with splitting the active root partition from inside initramfs during the first reboot (cool, right?), but again, given that this is our main product, it felt like an insane risk to take. Pass.
- Boot into A/B directories: Given the lack of a spare partition, we experimented with having two copies of the image on the root partition in two different folders (e.g. /images/412 and /images/415), and then modifying initramfs to boot into /images/415 instead of /. Believe it or not, while it sounds super crazy, it actually worked and was super easy by messing with initramfs a little: mount --bind /images/415 /root did the trick. Everything booted just fine. However, lots of Linux tools (df, mount, …) got really confused by the fact that the root is not / — so we decided to pass on that as well.
3.2.2. Loops all the way!
After trying so many different ways of booting into an image, what we ended up doing almost sounds a bit boring. But boring is good, right?
The simplest and most reliable way we found to boot into an image was to leverage Grub’s loopback booting mechanism, combined with the loop support in initramfs (see loop=... parameter):
Grub, as you most certainly know, is a boot loader. Its responsibility is to load the initial RAM disk and the kernel. For this purpose, Grub has built-in read support for many file systems and as we will see shortly also for file systems within file systems via the loopback command. The loopback command will find an image file on the root partition and loop it, so that the linux and initrd command can be used like normal to find the kernel and RAM disk. Here’s one of the menu entries we generate (via a hook in /etc/grub.d) for our device’s grub.cfg files:
|
1 2 3 4 5 6 |
menuentry 'Custom OS (v415.0)' { search --set=root --no-floppy --fs-uuid 8c43bf01-046c-401c-8cb8-97cb658ef698 loopback loop /images/415.0.img linux (loop)/vmlinuz root=UUID=8c43bf01-046c-401c-8cb8-97cb658ef698 rw loop=/images/415.0.img ... initrd (loop)/initrd.img } |
In this example, Grub will first find the root partition (just like on a normal Ubuntu installation) by its UUID via search. It will then discover the image file /images/415.0.img on that root partition and finally find the kernel ((loop)/vmlinuz) and RAM disk ((loop)/initrd.img) inside the image.
It’s incredibly simple, but really also incredibly cool: The fact that a boot loader can do all that still amazes me.
Once Grub found the kernel and the initial RAM disk, it loads the RAM disk into memory (shocker!), which is then responsible for mounting the root file system before handing control over to the init process.
In Ubuntu, the initramfs-tools package provides utilities to create and modify the initial RAM disk. Luckily it already supports loopback booting, so typically there isn’t really much more to do besides passing a loop= parameter in the kernel line. If that is set, initramfs will loop-mount the root file system to the image via mount -o loop (see source code). Given that there is a pretty scary FIXME message in the code (# FIXME This has no error checking), we thought it’d be good to make that a little more resilient by adding error handling and fscking to it. In most cases, it should boot without messing with initramfs though.
That’s really it. A lot of words for such a simple solution.
Here’s what it looks like in practice. As you can see, this device’s root file system lives on /dev/loop0. This loop device was set up in initramfs and it points to the image file:

In this case, the image resides on the root partition (e.g. /dev/sda1) in /images/412.0.img. Note if an empty /host folder is present inside the image, initramfs will mount the root partition there:

3.4. Upgrading between images
So now we can build, distribute and boot images. If we combine these things, you can already see that upgrading from one image to the next is not hard:
- Clean up old images, download new image, import into pool, export to image file
- Migrate configuration from current image to next image
- Update Grub to point to new image
- Reboot
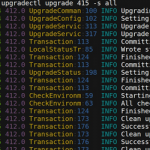
And that’s pretty much what we do. We wrote a tool called upgradectl for that:
upgradectl is typically triggered remotely by our checkin process: It prepares the upgrade in the background during normal device operation by downloading and exporting the image (step 1). And when it’s finally time to upgrade (usually at night when the device is idle), the actual upgrade process will be blazingly fast, because it only has to migrate configuration, update Grub and reboot (steps 2-4). Typically, the downtime for a device during an upgrade is about 5-10 minutes, depending on how long it takes to reboot (larger devices will take longer due to IPMI/BMC initialization).
Now of course there are tons and tons of gotchas and edge cases to consider: It sounds easy, but it’s really quite hard to get right — especially considering that our 80k existing appliances had been in production for up to 7 years.
That made for some fun challenges: We upgraded thousands of devices from Ubuntu 12.04 (and even 10.04) directly to Ubuntu 16.04. We implemented logic to deal with falling back to old images in case the upgrade failed for some reason or the next. We dealt with full OS drives, faulty hardware (disks, IPMI, RAM, …), RAIDed OS drives and Grub’s inability to write to them, ZFS pool corruption, hung Linux processes (good old D state), stuck reboots, and many many more.
But guess what: It was worth it. It felt like spring cleaning after a winter that lasted 7 years. We brought devices into the best shape of their lives. And we’re still doing it. Every 2 weeks!
4. Summary
In this post, I showed you how we changed the deployment process for our BCDR appliance from Debian packages to images. I talked about how we build images, how we distribute them and how we use Grub’s loopback mechanism to boot them.
While I touched all the pieces to perform image based upgrades, the most exciting thing about all of it is this: Using this mechanism, we can move between kernels and even major operating system versions. We’re effectively booting into a completely fresh, new operating system every time we ship an upgrade. That means that the system won’t deteriorate over time, manual changes will be wiped out and that we could technically switch Linux distros in a heartbeat if we wanted to.
And all of this is done in the background, with no interaction of our customers, completely invisible to their eyes: 80k operating system upgrades every two weeks, how cool is that?
Re: Image based upgrades.
Fascinating really.
But how do you put back network configurations or user passwords that are unique to each machine?
Two strategies: Either you have a config mount or you copy the config back into the image. We do the latter.
This blob has been very helpful for our update strategy, thanks Philipp!
One question – when you have a new software release, do you need to generate differential OS upgrade files for every prior release? For example, when releasing OS 420, do you need to build many differential OS upgrade files such as 412-to-420.zvol.xz, 413-to-420.zvol.xz, 414-to-420.zvol.xz, etc? Thanks!
> This blob
Made me smile :-)
> do you need to generate differential OS upgrade files for every prior release?
No, when a device attempts to download a diff, e.g. “12-to-17.zvol.xz”, the image server may respond with “come back later” and will kick off the creation of the diff. When the device comes back, eventually the diff file will be there.
You have to do a little housekeeping to make sure your disk space on the image server doesn’t infinitely grow.
Thanks for continuing to blog (not blob) your work Philipp.
Another thing I’m curious about is if you mount any partition as read-only, or read-write? I don’t see anything in your post that would require you mount any filesystem as read-only, but I just wanted to double check. Mounting the filesystem as read-write is the normal situation for Ubuntu based systems, so I can see this being preferable.
Read only is always the goal, but it’s hard. It’s read-write for us, and we then migrate files between images on upgrade. It’s a very small set of things we migrate, so manual changes are obviously lost between upgrades for most files.
What you’ve implemented seems like the best solution for OTA updates for Ubuntu based (ie. non Yocto) devices we’ve found. And the advantage of using Ubuntu is you get image updates (ie. Ubuntu 20.04 to 22.04) for free (unlike Yocto, where upgrading can be challenging). With Ubuntu the disadvantage is image size though.
1 other question – just before the image update occurs you need to have space for both the current and the new image on your root directory. If the space is not available for the new image do you try to clean up files on this root directory until you have room for the new image in order to perform the image update?
> If the space is not available for the new image do you try to clean up files on this root directory until you have room for the new image in order to perform the image update?
Yes. It’s a whole thing in our upgrader. We have room for 2.5 images on the root disk, and more on the newer devices. Assume the worst, because it’ll happen.
Thanks again for this extremely helpful post. Do you have a blog on your build system, specifically how you use aptly to reproducibly build an image? This is an important piece we’re missing in order to get differential OS upgrades missing. We can search & learn ourselves on doing this, unless you’ve blogged on this already :)