Capturing HTTP and HTTPS traffic on your own machine is quite simple: Using tools like Wireshark or Firebug, sniffing the local connections is only a matter of seconds. Capturing and/or altering the HTTP/HTTPS traffic of other machines in your network (such as your smartphone or other laptops) on the other hand is not so easy. Especially sniffing into SSL-secured HTTPS-connections seems impossible at first. Using mitmproxy, however, makes this possible in a very easy and straight forward way.
This small tutorial shows how to use mitmproxy to transparently sniff into and alter (!) HTTPS connections of your phone or other devices in your network.
Contents
1. How it works
Mitmproxy is an open source proxy application that allows intercepting HTTP and HTTPS connections between any HTTP(S) client (such as a mobile or desktop browser) and a web server using a typical man-in-the-middle attack (MITM). Similar to other proxies (such as Squid), it accepts connections from clients and forwards them to the destination server. However, while other proxies typically focus on content filtering or speed optimization through caching, the goal of mitmproxy is to let an attacker monitor, capture and alter these connections in realtime.
1.1. Attacking HTTP connections
For unencrypted HTTP connections, this is quite simple: mitmproxy accepts a connection from the HTTP client, say a mobile browser, displays the request (and its request parameters) to the attacker on the screen, and forwards the request to the destination web server as soon as the attacker confirms — maybe after adjusting the request payload a bit. mitmproxy simply acts as a middle man: To the client, it looks like as if the mitmproxy server was simply relaying its connection (like your router or your ISP’s servers do). And to the server, it looks like the mitmproxy server is the client.
1.2. Attacking HTTPS connections
While attacking unencrypted HTTP traffic can be done without having to deal with X.509 certificates and certificate authorities (CA), SSL-encrypted HTTPS connections encrypt every request and response between client and server end-to-end. And because the transferred data is encrypted with a shared secret, a middle man (or a proxy) cannot decipher the exchanged data packets. When the client opens an SSL/TLS connection to the secure web server, it verifies the server’s identity by checking two conditions: First, it checks whether its certificate was signed by a CA known to the client. And second, it makes sure that the common name (CN, also: host name) of the server matches the one it connects to. If both conditions are true, the client assumes the connection is secure.
In order to be able to sniff into the connection, mitmproxy acts as a certificate authority, however, not a very trustworthy one: Instead of issuing certificates to actual persons or organizations, mitmproxy dynamically generates certificates to whatever hostname is needed for a connection. If, for instance, a client wants to connect to https://www.facebook.com, mitmproxy generates a certificate for “www.facebook.com” and signs it with its own CA. Provided that the client trusts this CA, both of the above mentioned conditions are true (trusted CA, same CN) — meaning that the client believes that the mitmproxy server is in fact “www.facebook.com”. The figure below shows the request/response flow for this scenario. This mechanism is called transparent HTTPS proxying.
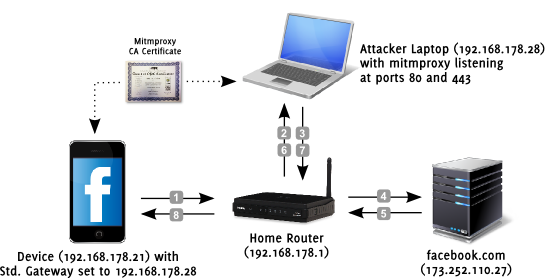
For this attack to work, there are a few conditions that must be met:
- Mitmproxy as standard gateway (HTTP and HTTPS): For both HTTP and HTTPS proxying, the server running mitmproxy must of course be able to intercept the IP packets — meaning that it must be somewhere along the way of the packet path. The easiest way to achieve this is to change the default gateway in the client device to the mitmproxy server address.
- Trusted mitmproxy CA (HTTPS only): For the HTTPS proxying to work, the client must know (and trust!) the mitmproxy CA, i.e. the CA key file must be added to the trust store of the client.
1.3. More Details
In case that description is not detailed enough for you: There is a wonderful explanation of how mitmproxy works and its different modes of mitmproxy on the official website of the project.
2. Install & run mitmproxy
After this little theory session, lets get down to business.
2.1. Install mitmproxy
The installation of mitmproxy is very simple, because it’s been packaged using the Python package management system (pip). Other mitmproxy dependencies can be installed with apt-get:
|
1 2 |
apt-get install python-pyasn1 python-flask python-urwid python-dev libxml2-dev libxslt-dev libffi-dev pip install mitmproxy |
2.2. Install mitmproxy CA certificate in the phone
Next, you need to install the mitmproxy-generated CA certificate in the device for which you want to capture/alter the HTTPS connection. This can be a desktop browser, or a mobile phone (Android, iOS, ..). The mitmproxy documentation has a good section that tells you how to do this.
Here’s a short summary for Android:
- Upload the certificate located at ~/.mitmproxy/mitmproxy-ca-cert.cer to /sdcard/Download/mitmproxy-ca-cert.cer of your Android device.
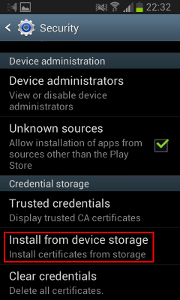
- Go to Settings, Security and click “Install from device storage”
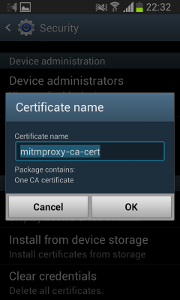
- Enter “mitmproxy-ca-cert” (no suffix!) and click “OK”
- Now click on “Trusted credentials” and select the “User” tab. The certificate should now appear in the list.
2.3. Enable IP forwarding and port redirection
The mitmproxy application internally runs on TCP port 8080, but externally has to listen on ports 80/HTTP and 443/HTTPS. Therefore, a IP forwarding in general (the system must act as a router) and a redirection from 8080 to 80 and 443 is necessary for all arriving IP packets. The “nat” table of iptables can be used to do that pretty easily. This is also described in the Linux section of the mitmproxy manual.
|
1 2 3 |
sysctl -w net.ipv4.ip_forward=1 iptables -t nat -A PREROUTING -i eth0 -p tcp --dport 80 -j REDIRECT --to-port 8080 iptables -t nat -A PREROUTING -i eth0 -p tcp --dport 443 -j REDIRECT --to-port 8080 |
It’s not clear to me why the application does not simply bind to the ports 80 and 443 ports, but that’s how it is right now.
2.4. Start mitmproxy
As mentioned above, mitmproxy runs on port 8080, but also needs 80 and 443 to be bound, all three ports cannot be used by any other applications at the same time. So simply stop anything that might be blocking those ports (Apache web server, Tomcat, Glassfish, etc.). If you’re unsure, check out netstat -ntap.
Important side note: mitmproxy has the option “-p”, which allows you to choose a different port than 8080. This option did not work for me when I tried it. While it did listen on the given port, no requests were intercepted. The display just stayed blank. It unfortunately cost me three hours to find that out.
To actually start mitmproxy, simply run this command:
|
1 |
mitmproxy -T --host |
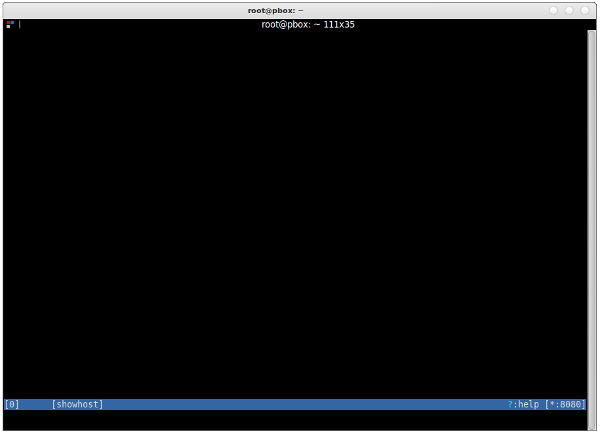
You’ll see a blank black screen with a blue bar on the bottom — and nothing will happen because your phone (or browser) does not yet communicate via mitmproxy. Familiarize yourself with the UI, read the docs on the official site, and check out the help page by typing ?.
2.5. Change the standard gateway of the phone
To be able to sniff into your phone’s (or browser’s) HTTP/HTTPS connections, you need to change the standard gateway to the IP address of the mitmproxy server.
You can do this on Android like shown below:
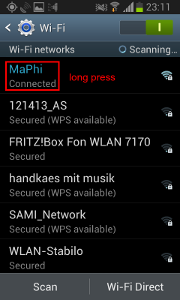
- Go to Settings, Wi-Fi and long-press on your connected network.
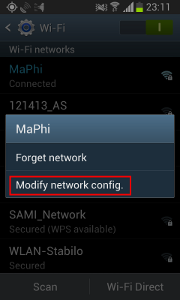
- Choose “Modify network config.”
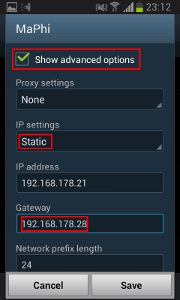
- Check “Show advanced options”, set IP settings to “Static” and manually change the gateway address to the mitmproxy server address. Click “Save”.
2.6. Capture and alter HTTP/HTTPS requests and responses
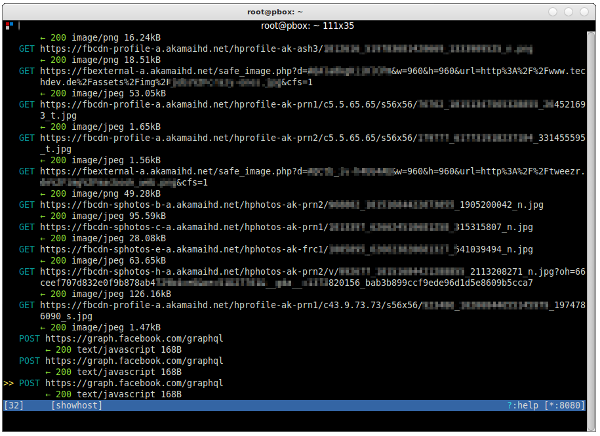
After you’ve changed the settings, start interacting with the device (go to facebook.com, update your WhatsApp status, open your browser). If everything works, you should see lots of HTTP and HTTPS (!) requests on the mitmproxy screen.
You can navigate up and down using your arrow keys. Press the return key to look at a request in more detail if you like.
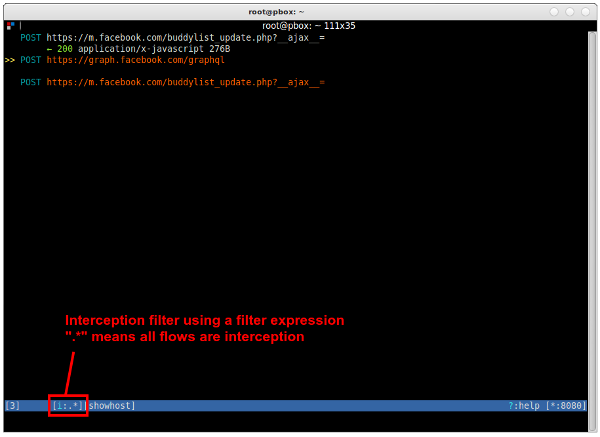
As you’ll notice, right now, you do not have the chance to alter any request. You can simply look at them after they happened. To actually intercept, alter and then send the request (or response), you have to set an interception filter. To do so, press i and enter a filter expression such as “facebook.com” (intercept all requests that contain “facebook.com” in their URL) or simply “.*” (intercept all requests/responses).
Intercepted flows will appear orange in the UI. They will not be further processed until you accept them (with or without editing them). To accept a flow, press a. To accept all holding flows, press A.
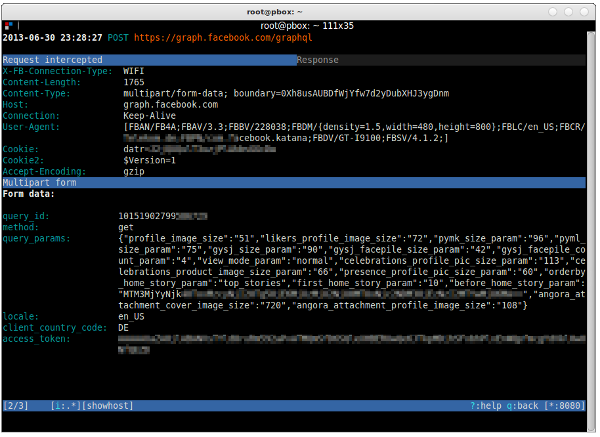
Intercepted flows can also be inspected in more detail by pressing the return key. In contrast to before, however, they can also be edited by pressing the e key. Depending on which mode you chose, you can edit different parts of the request: header, body, etc. — using vim or other editors.
2.7. Stop mitmproxy and undo iptables changes
Before stopping mitmproxy make sure you don’t want to save any of the flows. If you do, w will do it. To exit, press q and then y.
To undo the iptables changes we’ve done earlier, simply type iptables -t nat -F (flush/delete the whole table). If you have any other ‘nat’ table entries, you might want to remove the entries manually one by one. If unsure, check first with iptables -t nat -L.
If you want, also undo the IP forwarding setting by typing sysctl -w net.ipv4.ip_forward=0.
3. Further thoughts
3.1. Using DNS instead of the standard gateway
The method below requires changing the standard gateway of the device/phone. While this method works quite well, it requires changing the network settings of the device. Instead of using the standard gateway to redirect connections, one could also think of using a fake DNS server to do that.
So the default gateway on the phone stays the same. Instead, the DNS server in the router is changed to a local DNS server that returns the mitmproxy IP address for all domains to be monitored. This should work perfectly fine if mitmproxy and the DNS server do not run on the same machine. If they do, mitmproxy would resolve the domain to itself, which would of course lead to nothing.
I have not yet tried this, however, I am confident that it should work.
3.2. Why this is more scary than you think
I am not much of a conspiracy type of guy, but the recent headlines about the Internet spying activities of various intelligence agencies around the globe (cf. PRISM, Tempora) have really shocked me a bit. Why? Well, consider the following two thoughts:
Access to Internet Exchange Points: If a person (or a government agency) can tap into Internet and phone communications at an Internet Exchange Point (such as DE-CIX or similar) that means that this person can capture all of the connections going through that node. That includes HTTP traffic, mail traffic via SMTP, etc. — simply everything that using TCP or UDP as a transport. Unencrypted traffic (HTTP, SMTP, FTP) is readable by everyone who has access to this node. Encrypted traffic (HTTPS, or any TLS/SSL-secured connection) can, however, not be deciphered by that person.
Access to a trusted certificate authority: If that same person also has access to a certificate authority whose CA certificates are globally trusted (like one of the thirty-something trusted CAs that are shipped with all the browsers and operating systems), that person can use the above described man-in-the-middle attack to decipher any TLS/SSL connection.
In short: access to internet exchange points plus a private key of a major root CA certificate of a trusted certificate authority equals the ability to break every TLS/SSL connection that goes through the respective node. Scary, right?
3.3. Sniffing into non-HTTPS traffic
Sniffing traffic with mitmproxy is limited to HTTP and HTTPS conversations only — meaning that you cannot listen into non-HTTP(S) traffic with mitmproxy. If you’re interested in transparently sniffing plain SSL sockets, you might want to try SSLsplit, a transparent TLS/SSL man-in-the-middle proxy. Also check out my tutorial on how to use SSLsplit to spy on non-HTTPS conversations (e.g. SMTP over SSL or IMAP over SSL).


I tried this howto and cannot get it working in terms of any traffic to show up, at all.
Both android phone and laptop running mitmproxy are on same wifi network, and I set gateway on android device to be IP of laptop on wifi network, but still no go:(
Sorry to hear that. There’s unfortunately not much I can do from here. Here are a few things that might be wrong. Maybe this helps:
1. Make sure IP forwarding is switched on (sysctl -w net.ipv4.ip_forward=1)
2. Disable everything else on port 8080
3. mitmproxy did not work for me on any other port than 8080, the ‘-p’ option seems to be broken
4. I have also not succeeded with the ‘-b 192.168.178.20’ option trying to listen to a different interface than eth0 — meaning that I did not yet succeed to run it on my laptop, but only on my HTPC with cable-bound network access.
5. Try dumping all the IP packets using the tcpdump utility — run something like this: sudo tcpdump -vv -i eth0 ‘port not 22’. If you see any traffic from your Android device (look for the corresponding IP address), mitmproxy should also pick up something. If not, the IP packets are not redirected to your laptop. You can also use Wireshark to do that.
6. And if all that does not succeed, you can use SSLsplit. It’s way less pretty and you cannot intercept traffic, but it can be used for non-HTTPS traffic as well:
I’ll see if I can figure out other things to help, but that’s it for now…
I updated the post and added a link to my SSLsplit tutorial: http://blog.philippheckel.com/2013/08/04/use-sslsplit-to-transparently-sniff-tls-ssl-connections/
He, I installed mitmproxy, no problem, I run it, I configure Firefox Browser To use Proxy in localhost:8080
sirius /home/emiliano # netstat -putan
Active Internet connections (servers and established)
Proto Recv-Q Send-Q Local Address Foreign Address State PID/Program name
tcp 0 0 0.0.0.0:8080 0.0.0.0:* LISTEN 1636/python2
But where i want to go google.com, I have white page en firefox, and nothing traffic is shown in mitmproxy screen.
Any help? Thanks.
Try to check tcpdump if there is traffic at all…
I think both, twitter and whatsapp apps verificate the Issuer field of certificate (by openssllib), then if Issuer isn’t XXX CA then throw error. MITM is not posible :(
I encountered the same problem, but I am not so sure that it’s a CA-verification via fingerprint-comparison. Check out my updates here: http://blog.philippheckel.com/2013/07/05/how-to-sniff-the-whatsapp-password-from-your-android-phone-or-iphone/#Updates
And the corresponding post here: https://github.com/shirioko/MissVenom/issues/7#issuecomment-21899690
I experienced the same on my phone. Found your blog while googling for it. mitmproxy shows no traffic for Android apps like Twitter, G+, WhatsApp. Sniffing on the device itself shows that it is successfully doing the SSL handshake, but resets the connection afterwards (TCP RST). I am too lazy to smali and backsmali it, but that would be the next step.
Hi,
Thx for this guide. Currently I have issues installing mitmproxy.
apt-get install python-pyasn1 python-flask python-urwid -> works
but: pip install mitmproxy
-> gcc -pthread -fno-strict-aliasing -DNDEBUG -g -fwrapv -O2 -Wall -Wstrict-prototypes -fPIC -I/usr/include/python2.7 -c source/str_util.c -o build/temp.linux-x86_64-2.7/source/str_util.o
source/str_util.c:25:20: schwerwiegender Fehler: Python.h: Datei oder Verzeichnis nicht gefunden
Kompilierung beendet.
error: command ‘gcc’ failed with exit status 1
—————————————-
Rolling back uninstall of urwid
Command /usr/bin/python -c “import setuptools;__file__=’/usr/local/lib/python2.7/dist-packages/radicale/build/urwid/setup.py’;exec(compile(open(__file__).read().replace(‘\r\n’, ‘\n’), __file__, ‘exec’))” install –single-version-externally-managed –record /tmp/pip-USJMF0-record/install-record.txt failed with error code 1
Storing complete log in /home/xxx/.pip/pip.log
I hope a beginner error.
Regards, falk
My configuration:
[PC1]o——-o[PC2]o—–o[Router]o—(Internet)
PC1 – client side, using chromium
PC2 – mitmproxy, installed
OS PC1, PC2: Ubuntu 12.10
PC1:
Chromium: – Settings – Network – Change proxy settings – Network proxy –
Http Proxy – ip addr PC2, port 8080
Https Proxy – ip addr PC2, port 8080
PC2:
1. sysctl -w net.ipv4.ip_forward=1
2.
iptables -t nat -A PREROUTING -i eth0 -p tcp –dport 80 -j REDIRECT –to-port 8080
iptables -t nat -A PREROUTING -i eth0 -p tcp –dport 443 -j REDIRECT –to-port 8080
Trial:
PC2:
1. start console: mitmproxy (no arguments)
PC1:
1. Chromium – google.com:443
Traces:
PC1 PC2: establish connection SYN, SYN-ACK, ACK
PC1 -> PC2 (port 8080): CONNECT www.google.com:443
I hope that PC2 forwards the CONNECT request to google.com, but this does not happened
Question: Are there missing steps.
Please give me advice. Thank you for your effort
From the top of my head I’d say you haven’t installed the mitmproxy CA certificate in your browser. Or have you?
Yes, the certifcate is created when a mitmproxy console is started. Under the dir PC2:~/.mitmproxy there are 4 files created – they are: mitmproxy-ca-cert.cer, mitmproxy-ca-cert.p12, mitmproxy-ca-cert.pem, mitmproxy-ca.pem.
>It’s not clear to me why the application does not simply bind to the ports 80 and 443 ports, but that’s how it is right now.
I think that the reason is that normally a proxy only have to listen to the proxy port (8080 as the default) but since not all apps on the phone is proxy aware then Android shuffles all those requests to port 80 and 443 to the proxy anyways.
So proxy aware apps talk to port 8080 and use the socks-protocol while all other apps talks to port 80/443 and use plain http/https.
Mitmproxy however could be changed to listen to all three ports at the same time but that is perhaps some major changes to the code (I don’t know Python) and also that would require it to run as root (since it’s a port < 1024).
hi, I’am trying to run mitmproxy on an android device(nothing to with PC), to modify a specific App’s traffic. However I have no idea how to do it, would please give me some advice.
how i can get mitproxy?
Let me Google that for you:
http://lmgtfy.com/?q=mitmproxy+installation&l=1
Since I’m more of a Windows user (though I’ve had some experience with Linux), I’ve spent hours trying to do this via a Linux (specifically, Ubuntu) guest in VMWare and it was a terrible mistake. My phone could not use the VM Linux as a gateway for some reason and I eventually had to install a dual boot Linux just to get it to work. So for those of you who tried the same thing I did but always get a time out/page could not be displayed from your phone, this may be the reason. The connection type setting in VMware didn’t seem to help no matter what I set it to.
Hi Philipp,
Thanks for the wonderful instructions. I have configured all the things which you have mentioned. But after installing the mitmproxy on my ubuntu machine when I am trying to start the proxy using sudo mitmproxy -T –host, I am getting an error message which make me stuck
“Error: mitmproxy requires a UTF console environment.
Set your LANG enviroment variable to something like en_US.UTF-8”
Any help will be appreciatable.
You’re forgetting about one thing – if you have a “router on a stick” (where traffic gets in on the same interface that it gets out), you have to disable sending redirects. Otherwise the redirects will cause the traffic (at least from linux/android devices) to reroute to the “proper” router and miss the mitmproxy machine completely.
Hi, i was modifying packet , but i couldn’t read field of score data in mobile game.
i want to check game score data when i played game because i want to try to modify packet about score data.
for example, when i played mobile game, i could see many packet in mitmproxy.
However i couldn’t see packet with score data that i want.
please answer me ASAP.
If you are fine, please send answer to my e-mail.
dongho1918@gmail.com
Thanks.
Great post!
I followed your instruction and the proxy worked flawlessly for me, I can see Android/iPhone SSL traffic that I am interested in.
For the -p port option, I believe it’s setting the proxy in explicit mode instead of transparent mode, so it’s not going to work with -T options.
I did just “mitmproxy -p 1010 –host” to start the proxy,
then on iPhone, set http proxy server to my server running mitmproxy and port 1010, the proxy will capture the traffic the same way both http and https.
When mitmproxy is running in explicit mode, there is no need to enable ip forwarding and nat rule to redirect dport 443/80 to what the proxy is listening on (8080). The drawback for explicit proxy mode will be for some Apps that do not use system’s proxy setting and will just go by their own http stack.
Anyway, this is great, worked for me.
Thanks!
Just wanted to say that, you can run your own DNS on the same machine as mitm-proxy or any other proxy. In fact, on a single machine you can run 2 different local “fake” web servers, forwarding proxy server and a dns server. You just have to code the DNS server to do exactly what DNS servers do: search upstream for records it does not claim authority of and return them.
The problem, however, with this approach is that you cannot tell on the DNS server side what traffic is HTTP/HTTPS/etc. You have no idea what the name is being resolved for, what service is going to be used to connect to the requested host, etc. Well, that’s not true. You can’t easily do it. You have to delay answering the DNS query, grab the return port (the port that is bound waiting for an answer), then run a platform-specific netstat command to see what program is currently binding that listening socket. If you can do that, then you can decipher if the .exe is a browser, email client etc and decide based on that information whether to modify the DNS response to commence MITM or not.
So, it’s absolutely possible but not practical, because running this command on windows can take several seconds to resolve. If there was a corresponding Win API that does the same thing, and it was fast, then yes you could deploy a complete MITM that hijacks via DNS poisoning, either by setting the dns server to localhost or capturing outbound DNS request and simply responding before the remote server does.
I installed mitmproxy on my MacBook with OS 10.6.8 through:
1. easy_install pip
2. pip install mitmproxy
3. easy_install argparse
But I get now this error when I try to start mitmproxy with:
mitmproxy -T –host
root# mitmproxy -T –host
Traceback (most recent call last):
File “/usr/local/bin/mitmproxy”, line 3, in
from libmproxy import proxy, console, cmdline
File “/Library/Python/2.6/site-packages/libmproxy/proxy.py”, line 4, in
from netlib import tcp, http, certutils, http_status, http_auth
File “/Library/Python/2.6/site-packages/netlib/tcp.py”, line 12, in
OP_COOKIE_EXCHANGE = SSL.OP_COOKIE_EXCHANGE
AttributeError: ‘module’ object has no attribute ‘OP_COOKIE_EXCHANGE’
macbook-wlan:Documents root#
What is this missing?
Thank, frank
Why should an victim install a CA or set a proxy by his own? No way :|
1. Getting physical access to the machine is often easier than you think.
2. If physical access is not possible, a virus/malware could install it
3. If that is not possible, with enough influence, access to any of the big CAs out there is surely possible. Do you trust all the companies that installed CA certs in your browser? Do you know who can issue certificates for them?
Hello and thanks for tutorial. I need to learn my gateway addres for enter my phone. But i cant reach it how can i learn? thank you
Nice article, it helped me. Could you please tell me how to set a parent proxy using mitm proxy. I got into the console by typing mitmproxy -T –host. Please help me with the command -F http[s]://hostname[:port]
Thanks for the post,
but cannot we arpspoof the victim to our fake “.cer” and get his passes
HTTPS
???
cause i think its not a good idea to manually put the cert.. file in the device (phone or pc)
How do I install this on Windows? I want to intercept some https calls from my browser and return my own response rather than passing the request through to the actual host where the request is being sent. Is this possible?
Hi Philipp, thanks for this wonderful sharing. I encounter such problem, could you give any advice?
1. All are OK. But I use VPN (connect phone to pc) not pointing the gateway.
2. If I set iptables as following:
“iptables -t nat -A POSTROUTING -o eth0 -j MASQUERADE”
My android phone can access the internet. but mitmproxy cannot capture anything (of course, no traffic forwording to port 8080…)
and if I set as following:
“iptables -t nat -A PREROUTING -i ppp0 -p tcp –dport 80 -j REDIRECT –to-port 8080
iptables -t nat -A PREROUTING -i ppp0 -p tcp –dport 443 -j REDIRECT –to-port 8080
iptables -t nat -A POSTROUTING -o ppp0 -j MASQUERADE”
my android phone has internet access (of course mitm can capture the traffic), but dns seems work abnormlly. For example, i can browse “8.8.8.8” (just example), but cannot browse “www.google.com” in browser.
execute curl In adb shell:
“curl -v http://www.google.com”
get error:
“* Rebuilt URL to: http://www.baidu.com/
* Hostname was NOT found in DNS cache”
Any idea of this? Thanks!
@Anish Ninan June 28th, 2014
to set your LANG enviroment variable to en_US.UTF-8 on a mac use
“export LANG=en_US.UTF-8”
test using “locale”
Hi, I was trying to test mitmproxy and have it working if I use the CA created as in the tutorial. I did register a certificate from Comodo, and tried to install it but I cannot get it working. When using the Comodo cert, it comes up as mismatched address.
I read that there was a branch that fixed this issue, called chain_certs or cert_chains, but I have no idea how to use/compile that branch instead.
Do you have any information on how to use the Comodo cert (they sent me 4 different crt files) with mitmproxy? Thanks!
Hi Philip,
First I would like to thank u for sharing such trick with us, really appreciated. I can now Intercept SSL traffic through browser but I have iPhone and yahoo is configured and I tried a lot to recover my password but it didn’t work out, then I use mitm proxy as u suggest in sslsplit tutorial but still can’t see my yahoo password after Intercept, if you could guide me out on the same will be appreciated
i mean password is already saved in imap ssl then how we can view ?
From where i can get mitmproxy server address?
The same computer ip where you have install and running mitmproxy tool
I think i am a little step away from joy – my phone is navigating and I capture trafic in mitmproxy but when I got to launch WA I get disconnection errors and if I do mimdump I get:
192.168.205.99:47522: clientconnect
192.168.205.99:47522: HttpError(“Bad HTTP request line: ‘\\x16\\x03\\x01\\x00\\xb3\\x01\\x00\\x00\\xaf\\x03\\x01T\\x8bt\\xa9\\x1d\\xc7;\\x98\\x1aL\\xbe|\\x1d\\xa5\\xd7\\x96>\\xc9\\xb6\\x8a\\x9d\\xb5\\xe37\\xca\\x9a>\\x10\\xda\\xd9\\x84\\x9a\\x00\\x00F\\x00\\x04\\x00\\x05\\x00/\\x005\\xc0\\x02\\xc0\\x04\\xc0\\x05\\xc0\\x0c\\xc0\\x0e\\xc0\\x0f\\xc0\\x07\\xc0\\t\\xc0\\n'”,)
192.168.205.99:47522: clientdisconnect
192.168.205.99:48340: clientconnect
192.168.205.99:48340: HttpError(‘Bad HTTP request line: \’\\x16\\x03\\x01\\x00\\xb3\\x01\\x00\\x00\\xaf\\x03\\x01T\\x8bt\\xac\\x0b\\xf0<\\xc1\\x95_\\x82"?g\\x9e)\\x14{\\xf4\\xc6*oG\\x1d<\\x03\\xd60\\xe4\\x8dU\\x97\\x00\\x00F\\x00\\x04\\x00\\x05\\x00/\\x005\\xc0\\x02\\xc0\\x04\\xc0\\x05\\xc0\\x0c\\xc0\\x0e\\xc0\\x0f\\xc0\\x07\\xc0\\t\\xc0\\n\'',)
192.168.205.99:48340: clientdisconnect
anyone had this? can this be a certificate problem?
> It’s not clear to me why the application does not simply bind to the ports 80 and 443 ports, but that’s how it is right now.
It can bind to any port of localhost you want, but applications will normally be making requests to external hosts, so you need to silently redirect those hosts to localhost.
Hi
Thank you for your article.
I have installed mitmproxy from sources with pip on a debian 7 (wheezy) with python 3.2
Everything was built but I get the following error when running mitmproxy. Any clue would be welcomed. Please excuse my lack of knowledge with python
# mitmproxy
Traceback (most recent call last):
File “/usr/local/bin/mitmproxy”, line 2, in
from libmproxy.main import mitmproxy
File “/usr/local/lib/python3.2/dist-packages/libmproxy/main.py”, line 73
except ProxyServerError, v:
^
SyntaxError: invalid syntax
#
Hello Fred,
Have you done this before?
apt-get install python-pyasn1 python-flask python-urwid
apt-get install build-essential python-dev libffi-dev libssl-dev libxml2-dev libxslt1-dev
pip install mitmproxy
I had the same issues, on a debian 7 installation.
But gotta say I haven’t got it working, I can’t get internet access on my phone
sysctl -w net.ipv4.ip_forward=1
iptables -t nat -A PREROUTING -i eth0 -p tcp –dport 80 -j REDIRECT –to-port 8080
iptables -t nat -A PREROUTING -i eth0 -p tcp –dport 443 -j REDIRECT –to-port 8080
mitmproxy works perfectly with command “mitmproxy -T –host” that allows my android (chrome) to browse https page (e.g. facebook and gmail) and sniffs the username and password. But whatsapp cannot connect to Internet after I key in my phone for data recovery.
I tried to:
forward all tcp/udp port to 8080 (still not working);
use proxy on wifi (proxy port:1010; router as gateway) and with command “mitmproxy -p 1010 –host” (still not working)
any idea?
I have a general question about the subject.
Let’s say I have a certificate from a trusted CA for the domain “xyz.com”. A iOS mobile client is connected to my WIFI.
The client (in Safari or WebView) is trying to access https://www.facebook.com/. Can I redirect the request to my site “xyz.com”, for which I own a valid certificate?
Sure you can. In the interactive mode of mitmproxy, you can modify the HTTP response headers from facebook.com and add “Location: https://xyz.com/”. Not sure if you have to edit a few more headers to make it work (probably the response code too, like 302 or so), but that’s the general idea.
from where can i get the mitmproxy certificate. i mean where is the location of that certificate. i am using kali linux
You can create it yourself with openssl http://www.freebsdmadeeasy.com/tutorials/freebsd/create-a-ca-with-openssl.php
Or better yet use the one that mitmproxy creates at ~/.mitmproxy/mitmproxy-ca-cert.cer
Philipp, Thank you very much for great tutorial!
Great blog, have it working well. But was hoping to be able to run this without changing the gateway on the device. Did you ever get the DNS server idea working? i basically want to only change the gateway for the domains I am monitoring. Then have everything else follow the standard one.
hi ,i am using firefox in ubuntu .i changed proxy settings. i can see traffic in mitmproxy. But if i go to ‘mitm.it’ it is still showing “If you can see this, traffic is not passing through mitmproxy”.What changes i need to do to get ‘click to install certificates’ page.
The way that worked for me:
On phone:
Set proxy to SERVER:8080
On Linux:
Run mitmproxy (without -T –host)
I install mitmproxy in windows(mitmdump).it can show traffic but cannot change/alter them.How can i do.Is there any other tools like it.
how would you set the default gateway on a mobile data networ (not wifi) ?
Thanks for the great post!
It helped me very much.
@shevin
route add default gw IPADDR dev IFNAME
e.g.: route add default gw 192.168.1.10 dev eth0
Thank you , great blog!
When I tried to follow the tutorial with my phone as victim and kali based machine as attacker, everything works and there is no problems.
I’v got some issues when I tired to do so without changing the gateway of the device but to arpspoof it from my machine.
I forward all traffic from 443 and 80 to 8080 and change ip_forward to 1.
Ran
arpspoof -i wlan0 -t {{target}} {{gateway}}and the reverse as well.Than I ran mitmproxy -T –host –cert mitmproxy-ca-cert.pem.
The result is that the i can see all the packets when browsing with the browser and clicking “Continue to unsafe” (or whatever).
There are two problems :
1. Is there any way to bypass HSTS ?
2. Somehow I see nothing when packets come from apps using SSL.
Any idea how to mange this ?
From my point of view this setup will cause problems because of asymmetric routing. The “fake” gateway doesn’t do any NATing so the “real” gateway will will send the replies directly to the victim without the fake one in its path causing several possible security features on the victim to alarm which might kill the connection – depends on the implementation. Some posts above indicate exactly this (RST after initial connection and so on…)
Is there a way of getting the user to accept the certificate without having access to their phone?
Hi !!! Help me Please , and install mitmproxy in a virtual machine with “debian 8”, the screen but does not generate the CA, to install it on my Android Can you tell me what the correct or that does not generate the CA route and other questions can only do on a laptop or a PC with ethernet CONNECTION?
regards!!
It’s not working with Windows 10 Store Apps
Android works though
All good. But the issue of certificate pinning hasn’t been solved yet. Is there a solution to at least skip certain domains like apple.com. Squid has this. I’m trying a nodejs module that can do this but didn’t have any luck yet.
Hey, I came across this linked from a post about “hacking tinder” (I know, how original). Anyway, I’ve got everything up and running except I can only see GET requests (non-transparent, so this is obvious). When I try to run in Transparent mode, I just get “Warn: 192.168.1.6:62147: Transparent mode failure: RuntimeError(‘Could not resolve original destination.’,)”
Please help.
Kudos for this post! Still a newbe with Linux and got it to work.
I’m now trying to get the same setup to work with a DNS/hosts file entry to work. No luck so far: I get a 502 bad gateway error served from the mitmproxy.
Have you got this to work?
Appreciate your help,
Bob
Hi Philipp,
Very appreciate your work. Im playing with the mitm to capture https traffics to my honeypot (Because my honeypot can not read the https traffic). My setup likes this:
1. I redirect 443 client traffics to my honeypot that mitm is installed on the host. Im sure the 443 traffic going to my honeypot successfully.
2. Run these cmd:
sysctl -w net.ipv4.ip_forward=1
iptables -t nat -A PREROUTING -i eth0 -p tcp –dport 443 -j REDIRECT –to-port 8080
mitmproxy -T –host
3. Mitm is starting well but capture nothing. I have no idea how to fix this, please help
Doest it work? trying to find out if I don’t need to configure iPhone to trust MITM proxy root CA. What if I buy root CA from a trusted source that is supported by IoS OS. Then the certificate MITM create will be signed by the root CA bought from the trusted authority as per built in IoS trusted authority
is there anything exist application specific trusted CA? For example, I won’t be able to convince a user to install mitm CA for all applications, in that case I will be able to view username/password, banking information for sensitive application. But they won’t mind if the mitm CA is only valid for a streaming video app. Another option is to have selective CA for different web sites. For example, user will use trusted CA for all domain, websites except few streaming provider domain. Streaming provider domain which is proxied will use mitm CA
i have had mitm for over two years i cant find anyone who can help my family and i :( my webs are still in someone elses clutches being used for hacking
Philip amazing explanation, I was able to make the mitmproxy work perfecrtly, what I’m trying to do is save the logs but I have not been able, any guidance will be appreciate it. Thank you
TROUBLESHOOTING:
— You need to make sure your ports 80 and 443 are open on the Linux machine for this to work. If you can’t get mitmproxy to work, try temporarily disabling the firewall to see if the firewall is the problem: sudo systemctl stop firewalld
— Make sure you substitute you ethernet adapter address for eth0 in the iptables commands listed, otherwise they will fail silently. You can find your ethernet adapter using ifconfig. My adapter’s device name is enp5s0.
— Put the phone into airplane mode, then re-enable wifi only, if you want to make sure the requests are going over the right connection. (The Android device might think it still doesn’t have an Internet connection, and might fall back on the cell connection for requests that don’t go through.)
— Note that the “–host” switch is now “–showhost”; to launch mitmproxy use: mitmproxy –showhost –mode transparent