
Providing remote access to devices via SSH tunnels
At my work, the backup appliances are typically physically located inside the LAN of our end users — much like other appliances such as routers, NAS devices or switches. Under normal circumstances that means that they are behind a NAT and are not reachable from the public Internet without a VPN or other tunneling mechanisms. For my employer’s customers, the Managed Service Provider (MSP), only being able to access their devices with direct physical access would be a major inconvenience.
Fortunately we’ve always provided a remote management feature called “Remote Web” for our customers: Remote Web lets them remotely access the device’s web interface as well as other services (mainly RDP, VNC, SSH), even when the device is behind a NAT.
Internally we call this feature RLY (pronounced: “relay”, like the owl, get it?). In this post, I’d like to talk about how we implemented the feature, what challenges we faced and what lessons we learned.
Why access devices remotely?
Not having to drive to a site and physically manage a device is as important for our customers as it is for us:
When a customer calls with an issue on a device, our support team needs to be able to investigate what’s wrong. They need to be able to SSH into the device, monitor backups and change the configs. Being able to do that is vital for providing great customer support. Similarly, our customers want to be able to do the same if they get calls from their customers, or to simply set up and manage the appliance.
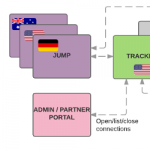
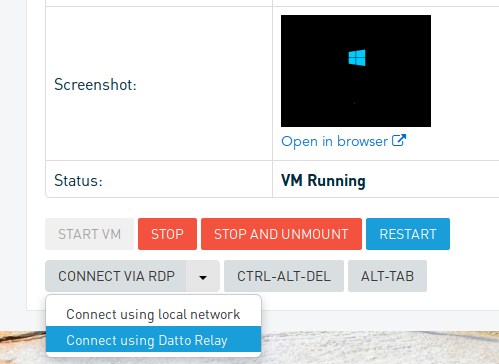
The primary use case for MSPs is accessing the device’s web interface. However, other use cases for this feature are not as obvious: The same technology that provides a remote web interface in the browser is also used in many small features. For instance, when a restore VM needs to be accessed from outside the LAN, we provide a way to do that with the “Relay”:
Reverse tunnels for the win!
So what is this magical technology that fuels these wonderful features? I’m sorry to disappoint, but it’s just plain old reverse tunnels using SSH. In short, it’s this: $ ssh -R
If you are now incredibly disappointed because you expected more, don’t be! We’ll get into interesting things about scaling this service to tens of thousands of devices.
In case you’re not familiar with what ssh -R does, let me briefly remind you:
ssh -R creates a reverse tunnel by connecting to a relay server, binding a port on that server and forwarding all incoming traffic on that port to the initiating client (in our case: the appliance):
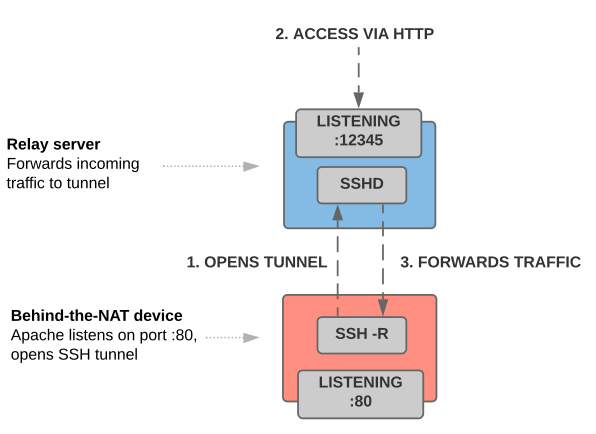
It’s a port forwarding mechanism that typically breaks through firewalls and NATs because it is initiated by the client that provides the service. In the picture above, the service being provided listens on port 80/HTTP — the web interface on the appliance. Just like TLS/SSL wraps HTTP (= HTTPS), using SSH has a similar effect here: We’re encrypting the HTTP traffic over the secure SSH channel.
When instructed to forward port 80, the device creates a reverse tunnel using ssh -R as follows (step 1):
|
1 2 3 4 5 6 7 8 9 10 11 |
mydevice> ssh \ -R 12345:localhost:80 \ -o ConnectTimeout=10 \ -o IdentityFile=... \ -o ExitOnForwardFailure=yes \ -o ServerAliveInterval=15 \ -o ServerAliveCountMax=2 \ -vvv \ -N \ ... \ user@rly.company.com |
Assuming a valid private key is provided, the SSH daemon on the relay server will bind the port 12345 and forward all incoming traffic on from rly.company.com:12345 to port 80 on the device. So a user could browse to http://rly.company.com:12345, and they would see this particular device’s web interface.
While that will work, there are two pretty obvious problems with this:
- First, the connection to the relay server is done over HTTP (as seen in the URL http://…), which these days is not acceptable under any circumstances.
- And second, given that there are only 65k ports, it is incredibly easy to discover valid URLs by just counting up.
Both of these can be easily fixed by putting a proxy server in between the SSH tunnel and the browser client. Equipped with a valid SSL certificate and a little bit of rewrite magic, it’s easy to turn http://rly.company.com:12345 into https://aabbccddeeff.rly.company.com. We use Apache for this (shortened excerpt):
|
1 2 3 4 5 6 7 8 9 10 11 12 13 14 15 16 |
<VirtualHost *:443> # Set up SSL SSLEngine on SSLCertificateFile "/etc/apache2/ssl/rly.company.com.crt" SSLCertificateKeyFile "/etc/apache2/ssl/rly.company.com.key" SSLCertificateChainFile "/etc/apache2/ssl/rly.company.com.chain.crt” # Set up rewriting & proxying # e.g. translates "aabbccddeeff.rly.company.com" to "localhost:12345" RewriteEngine on RewriteMap relaymap "prg:/usr/local/bin/relayrewrite" <Directory "/var/www"> RewriteRule ^ ${relaymap:%{REMOTE_ADDR}:%{REQUEST_SCHEME}://%{SERVER_NAME}%{REQUEST_URI}} [L,P] </Directory> </VirtualHost> |
To solve our first problem (HTTP), we listen on 443 and provide the proper wildcard certificates for our domain (here: *.rly.company.com). This will terminate SSL at the relay host, meaning all requests will be handled by Apache. That takes care of problem one.
In order to solve the second problem, we have to forward the request to the correct SSH connection (in our example the SSH daemon is bound to *:12345 on the relay host). To achieve that, we can use the RewriteMap stanza in Apache’s mod_rewrite module. Using the prg: option, each request can be rewritten dynamically by an external program (here: /usr/local/bin/relayrewrite). This program looks up the hostname, maps it to the correct SSH connection and finally rewrites the request. In the example above we are effectively proxying requests originally targeted to aabbccddeeff.rly.company.com to 127.0.0.1:12345, thereby connecting the Apache request to the SSH tunnel.
That’s it. Simple right?
Horizontally scaling reverse tunnels
Believe it or not it actually is that simple. For a very long time, we’ve pretty much done this without a problem for thousands of connections. For the first few years of my company’s existence, we had exactly one server that handled all of our reverse tunnel relay traffic. Occasionally we added RAM or upgraded to a bigger box, but eventually, as it grew, we needed a more reliable balanced system without a single point of failure. And of course, as we grew internationally, our partners in Europe and Australia started complaining about abysmal speeds. No wonder since traffic was bounced around the globe twice for every packet.
On top of that, we were facing other issues with the existing system, such as slow connection times, limited connection lifecycle management (no repairs of broken connections) as well as odd outgoing port requirements for our devices.
Requirements
Faced with these growing issues, we decided to take a step back and rethink how to scale the application from the ground up. We identified the following requirements:
- Horizontal scaling & load balancing, no single point of failure
- Allow maintenance of any component without customer impact
- All outgoing connections must work on port 80/443
- Connection time of under 5 seconds
- Geographically distributed relay servers to address slow international connections
- Auditable SSH sessions for support staff
- Time-limited key-based authentication/authorization
- Automated deployment via Puppet
The most obvious (and arguably the hardest) problem to solve is the first one in the list, i.e. avoiding a single point of failure. If you’ve ever built a distributed system you know what I’m talking about. Keeping things in sync is hard if you don’t have a single point in the application to keep state. But as with many things in computing, the hardest problems are also the most interesting problems to solve.
After a little bit of weekend-tinkering followed by many weeks of hard work, we came up with version two of our remote management system which we called RLY.
Introducing RLY
RLY is a highly scalable, distributed, high availability relay server application. While that certainly sounds impressive, at its core it still uses SSH tunnels to forward traffic between systems. The things we added along the way were merely to meet our scaling and deployment requirements.

To accomplish that, RLY is split into four components that closely interact with one another:
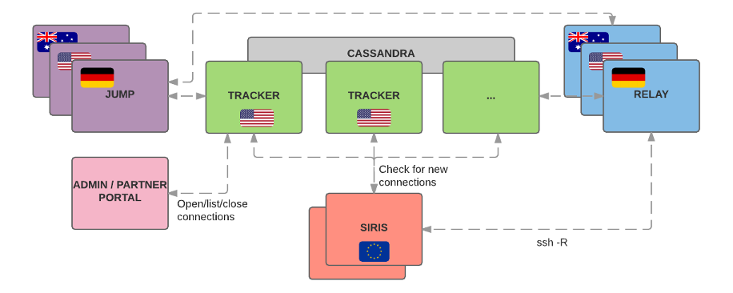
The RLY client is a command line client used by the behind-a-NAT device (here: our SIRIS/ALTO device). It provides a daemon waiting for incoming connections and a CLI to manually open time-limited tunnels if need be (rly open|close|...).
The tracker component is the brain of the system. It currently consists of a handful of physical servers in one of our US data centers. The trackers are the central hub to manage connections. They keep track of what connections are open, what ports to forward to and which relay servers to use. They also generate per-connection keypairs which are used to access a relay server. The component has a load-balanced API that is used by our portals and the jump hosts to open new connections as well as by the client devices to check for new connections. The tracker keeps state in a tiny Cassandra cluster.
The relay component is the one doing the heavy lifting. It consists of dozens of virtual machines in different data centers around the globe, close to where our partners devices are. Its main responsibility is to forward traffic from an end user to a behind-the-NAT device (via reverse tunnels as described above). Each relay host is isolated from its peers. The tracker is the only other component that talks to its API.
The jump component provides interactive SSH sessions to our devices for our support team and partners. Using one of these jump hosts, it is possible to SSH into a behind-the-NAT device by forwarding traffic to a local SSH daemon. The jump hosts are also located close to our partners and support teams to allow for a snappy SSH session. For audit purposes, all hosts monitor all interactive sessions via script.
Opening a connection
So how do the component work together? Let’s look at a simple example: Assume a partner wants to access their device’s web interface. Here’s a brief sequence diagram that shows the communication between the systems:

- When the user clicks on the “connect” button in our partner portal, the portal backend requests a new reverse tunnel to port 80 from one of the trackers. The tracker creates a new connection ID and subdomain, generates an SSH keypair and intelligently picks the relay host. The selection is based on the GeoIP-proximity between client and relay host IP addresses and load of the relay servers. This evenly spreads the load while ensuring connection speed.
- The tracker then tells the relay host to grant access to the generated keypair. The relay host saves this connection information, assigns a random relay port and waits for the incoming SSH connection.
- The client regularly checks for changes using a heartbeat mechanism that will trigger a checkin call if there are any changes. Checkin returns the new connection information, including the relay host, port and the ephemeral private key needed for auth.
- It then uses this information to open the reverse tunnel.
Now that the connection is open, end users can access the local web interface on the client via the browser, e.g. at ttps://xhaz32dhjmndf.rly.company.com.
I’d love to talk about how the dynamic DNS is implemented (hint: it’s similar to what I described in this post, but with a Cassandra backend), but that would probably blow up this post even more. In short: The trackers serve as authoritative name servers for the rly.company.com zone and respond with a CNAME pointing to one of the relay hosts when asked. The relay host then simply applies the same rewrite magic I described above to map the hostname to the connection-specific local port
Scalability and resilience
Using this architecture, scaling the system is really easy, because it merely consists of adding tracker hosts or relay hosts and making them known in the configuration. Adding relay hosts in particular is incredibly simple, because it just means deploying a new VM and making it known to the trackers. Adding a tracker, on the other hand, is a little more manual work, because it means adding a node to Cassandra and making sure the consistency guarantees still work out as expected. Since the clients use SRV DNS records to discover trackers, they will eventually pick up the new trackers and add them to their round-robin list.
So it certainly looks like the system scales, but does it fall over if parts of it fail? Let’s discuss some scenarios to show what would happen if individual components/servers fail:
Tracker host failure: If a tracker host goes down (or is taken down for maintenance), the Cassandra backend will continue to work, because it was configured with quorum read/write consistency, meaning as long as a majority of the cluster is alive, it will remain up and functioning. The RLY clients typically round-robin through the trackers so they’ll just mark it as failed and try again a couple of minutes later. So yeyy! We can survive a tracker going down. But what if more than half of them fail? As with any quorum based system, if more than half of the hosts go down, then we’re out of luck. In our case, that’d only happen if there is a row-wide outage in the data center. That’s a choice we’ve made consciously and a risk we’ve accepted.
Relay host failure: If a relay host fails, all SSH tunnels to that host break. While that is unfortunate, it only affects a small subset of tunnels and is automatically repaired within a couple of seconds: If a client detects that a tunnel broke it tries to re-establish the connection a couple of times (to account for connection blips). If that doesn’t work, e.g. because the host is down for good, it will ask the tracker to repair the connection. The tracker will assign a new relay host and the connection is up again.
Lessons learned
Developing RLY was a learning process. We kept the things that worked for us in the past, and we tried different ways to overcome the problems we had. RLY works and we’re proud of it, but we’ve learned many things along the way. In this section, we’d like to share some of our learnings.
Please take what we learned with a grain of salt: The fact that something didn’t work for us doesn’t mean it’s wrong or bad. It merely means that we either did it wrong, or that we used the wrong tool.
Distributed datastores across continents
RLY started as a pet project of mine. It was meant to work on a single host as well as on many hosts as a distributed system. Once we started experimenting with distributed datastores as a backend for the RLY trackers, we learned quite a few things really quickly.
In the beginning I had this idea that I could split the datastore that manages connections across different data centers and different continents — you know, for maximum fault tolerance and resiliency. I started with etcd as a backend store and three trackers in Frankfurt, Sydney and on the east coast of the US. I absolutely loved etcd. It was simple and exactly what I needed. On top of that it worked beautifully in my tests. Once I deployed it in my three tracker test setup though I realized pretty quickly that it wasn’t going to work. The latency was horrendous, and even with a lot of tweaking etcd couldn’t keep up with the amount of new/closing connections of RLY. I know what you are thinking: Why would anyone try etcd across continents? Honestly I don’t know what I was thinking. It’s pretty obvious now that that’s a dumb idea. Lesson learned!
After abandoning the idea of a datastore across data centers, we experimented with GlusterFS, Redis Cluster and a few others, but ultimately settled on Cassandra. In my test setup, Gluster was not dealing well with lots of small file changes. I bet there’s someone out there that knows how to tune it, but I gave up pretty quickly. Redis Cluster support was still pretty new at the time, and while it worked nicely I wasn’t happy using a brand new technology for a vital service like this.
We ended up with Cassandra in one data center and accepted the data center downtime risk. Cassandra works very well if configured properly. The topology matters a lot though. We decided to go with six tracker nodes and split them across three racks. Due to the low amount of data, our replication factor is six (all nodes have 100% of the data), our read consistency is three (read from three nodes) and our write consistency is quorum (write to four nodes). This gives us full read consistency (all trackers will respond with the same data). For anyone interested, there is a nice Cassandra consistency calculator that helps defining what you need.
With this consistency configuration and Cassandra’s rack-awareness, we can lose one rack (two servers) without the RLY system being affected. We tested this extensively before going live, and even in production when we moved all RLY trackers (two at a time) to a different data center.
They said HTTPS is fast
People on the Internet™ say that adding TLS to HTTP (= HTTPS) doesn’t make a big difference in performance. While that is probably very true for many scenarios, it wasn’t true for us: In our case, Apache cared very much about thousands of SSL handshakes per second, so much so in fact that all processors on all trackers were busy shaking hands with all of the RLY clients all the time.
The problem here of course lies in the way we designed the system: RLY has a heartbeat mechanism that calls out to the trackers every three seconds to see if there any new connections. While that works really well, it leads to pretty bad results if combined with Apache’s HTTPS implementation: The trackers pretty much died. The load was insane. Load averages of >1000 were common. All that TLS handshaking killed the tracker servers. After switching heartbeat to HTTP (don’t freak out, it just returns a timestamp!), the load was much better.
Obviously the heartbeat/checkin architecture is a little off and we could/should have used server side events (SSE) or something similar. We’d probably explore this option in more detail if we were to design the system again. However, given that we have other products for which the design has proven to work really well for years, we stuck with it.
bcrypt with a cost of 10
After solving the HTTPS handshake problem we still had load problems on the trackers, which turned out to be authentication related: To authenticate with the RLY tracker, the client uses a per-client secret key. In our database (think: on the trackers), we store a bcrypt hash of that secret key with the cost of 10 (i.e. 2^10 = 1024 rounds). bcrypt is of course designed to be slow and consume lots of CPU on purpose. After lots of analysis, we found that that was the cause for the load: The trackers were consuming a lot of CPU because they were constantly verifying bcrypt hashes.
Of course it took a bit of time to actually determine that as the root cause, but finding a solution was fairly straight forward: Instead of constantly verifying the bcrypt-2^10-hash, we would only verify it once every few hours, and generate a new bcrypt-2^4-hash upon first auth to use for subsequent requests. We store that weaker hash only in memory of course, but verifying that is much faster.
On my laptop, for instance, verifying 100 bcrypt hashes with the cost of 10 takes ~6 seconds, whereas a cost 4 comparison of 100 hashes takes only .01 seconds.
After that change the load was much much better.
Limits, Limits, Limits!
Another thing we noticed is that high traffic servers like the trackers need a few Linux kernel parameters set to function properly. This may be obvious to some, but it’s not obvious if you’ve never done this before (like me). Luckily we have some smart people in our systems engineering team that know exactly how to do that.
The default limits on a Linux system are too restrictive for high volume servers to perform well under load. Most notably the number of open files (nofile), the number of running processes (nproc) and the maximum number of queued connections (net.core.somaxconn) need to be increased. This is mostly so nginx and Cassandra are allowed to accept more connections.
Here’s our limits.conf configuration. It increases the hard and soft limits for the number of open files:
|
1 2 3 4 5 6 7 8 9 10 |
# <domain> <type> <item> <value> * soft nofile 1024000 * hard nofile 1024000 * soft nproc 10240 * hard nproc 10240 root soft nproc unlimited cassandra - memlock unlimited cassandra - nofile 100000 cassandra - nproc 32768 cassandra - as unlimited |
And here’s how we increase the number of allowed queued connections in sysctl.conf:
|
1 |
net.core.somaxconn=10000 |
There are much more details on how to vertically scale a Linux server for high load. Here’s a great article explaining the details.
Versioning and logging makes things easy
Something we actually did right from the beginning is to add a version string to everything. Every API call, every serialized object, and even every running process has a the RLY version number attached to it. That means we can easily identify old clients and always be backwards compatible. So far we only had to use the RLY version number once to change the relayPort field type to an array (to support multiple ports) and ensure that old clients don’t break. It worked very nicely. Versioning things FTW!
We also log pretty aggressively in RLY, which helps when debugging. All components can enable LogLevel DEBUG, which then logs everything, even the output of ssh and sshd. Log all the things, people! It helps!
OpenSSH does not scale well
Believe it or not, OpenSSH’s sshd is not meant to handle thousands or even tens of thousands of connections/tunnels. We realized this only about 1.5 years after the RLY system had been live when we were thinking about persistent connections instead of on demand tunnels.
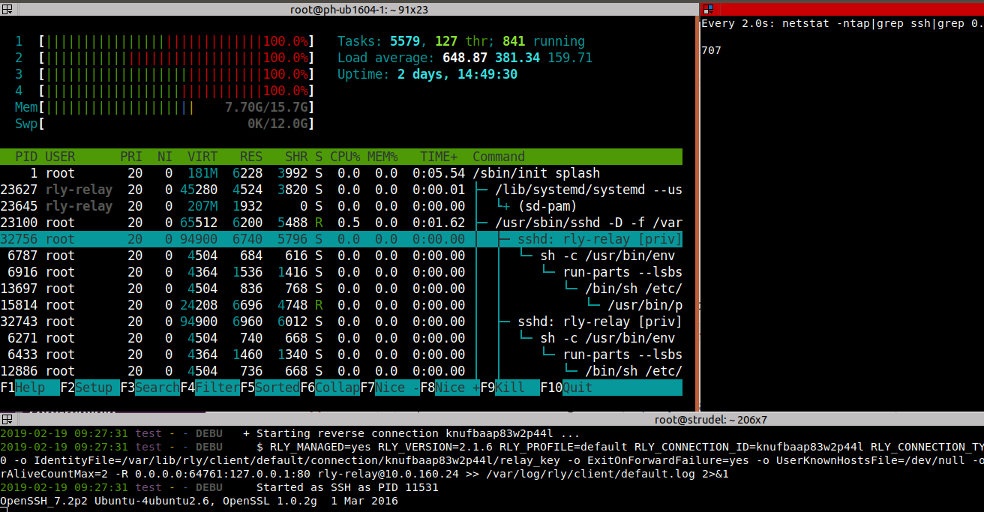
In my tests, on a VM with 16 GB of RAM and 4 CPUs, OpenSSH was really hammering the system when I opened 1,100 connections to it. It consumed about half of the RAM and the CPUs were pegged:
After researching alternatives to OpenSSH with the same feature set, we landed on using the Golang built-in crypto/ssh package with great success. The same VM was easily handling 16,000 connections with the CPU almost idle and 1.1 GB of RAM:
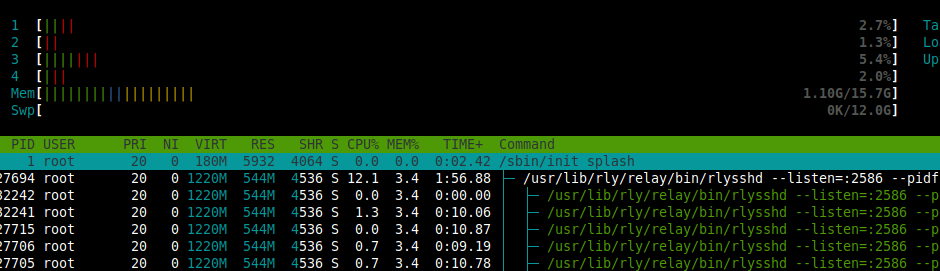
It would most likely be able to handle a lot more connections, but my laptop wasn’t able to handle more outgoing SSH tunnels so I stopped and called this “good enough”. Pretty cool right? Instead of adding dozens of new VMs to handle the traffic, we simply used a more appropriate tool.
Monitor and automated end-to-end testing pays off!
With dozens of servers around the globe, it’s important to be able to keep track of all of them in a centralized way and automatically end-to-end test the system regularly enough to detect potential problems before customers do. We put a lot of work into testing various parts of the system (opening tunnels, using the jump servers, …) and mapping the overall health of the system to a single number (0 = error, 1 = warning, 2 = ok).
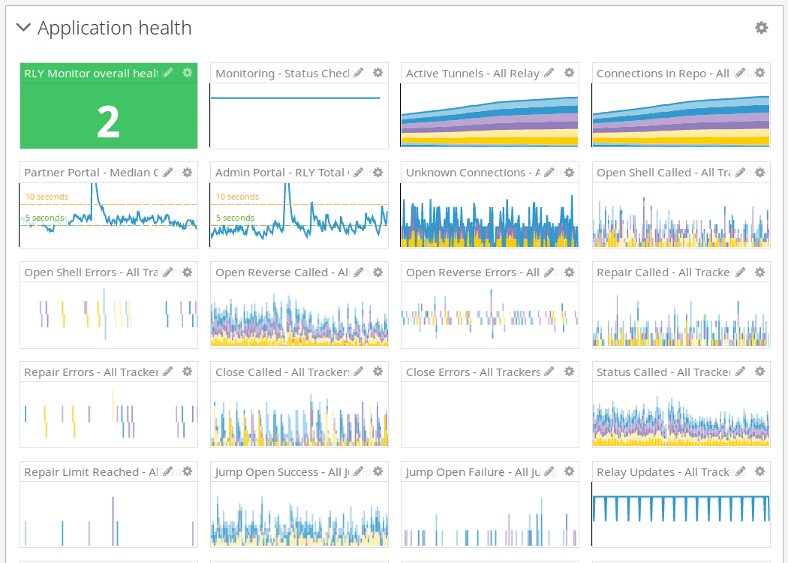
We then use this number to trigger alerts for our operations group and for visualizations in our RLY dashboard. Warnings include things that can be dealt with in the morning (relay host down, tracker down, …) and errors must be dealt with as soon as possible, because they have customer impact. We have caught quite a few almost-outages like this before anyone noticed!
Final thoughts
In this post I talked about how we use SSH reverse tunnels to access behind-the-NAT devices, and how we created a horizontally scalable application to support the fleet of all our backup appliances. I introduced our RLY application and its architecture with all its components. And finally I briefly talked about a few of our challenges and the lessons we learned.
RLY has been working really well for over two years now and for the most part, all users (internal and external) have been happy. We’ve had no significant outages and we’ve even moved some of the relay hosts and all trackers to a different data center without downtime. We have added more device types over time, starting from the BMC/IPMI in our backup appliances, to our DNA devices and most recently we’ve started work on integrating our other networking appliances.
Naturally, as with most systems, there are things we’d do differently now: We probably wouldn’t do a polling based system to check for updates on the client again (heartbeat/checkin). We’d also probably not use SSH for tunneling as something more lightweight would have also done the trick.
Overall, it’s not really worth changing any of these, because the system works wonderfully, scales great, and is pretty low maintenance. Thanks to all of the smart engineers that made RLY happen. It’s a pleasure to work with you every day.
Recent Comments