
Have you ever rebooted your computer only to see a black screen with a blinking cursor? If you have a USB drive attached, chances are the blinking cursor is caused by invalid bootstrap code in the Master Boot Record (MBR) on that drive which has caused the normal boot execution to stop without returning control to the BIOS. If you have physical access to the machine, simply remove the USB drive and/or change the boot order to pick the OS disk first.
If you have no physical access, things are a bit more tricky: This exact thing happened to me at work the other day. Unfortunately, it didn’t happen to my computer, but to a few dozen of our customer backup appliances during their scheduled upgrade/reboot. Now, while dozens out of over 60k isn’t that much, our customers rely on these devices, so it’s not acceptable to have them not boot properly.
In this short post, I’ll demonstrate how to reproduce the blinking cursor problem, and how to “fix” the MBR to ensure the computer still boots, regardless of the boot order.
Contents
1. Diagnosing a blinking cursor
Assuming that your system is booting via BIOS (not UEFI), you’ve surely encountered the infamous blinking cursor at least once:
When we encountered it a few months ago when a few of our customer devices refused to reboot, we were a bit puzzled at first. How could one possibly diagnose something like that without having physical access to the device itself? With lots of on site customer help, we quickly narrowed things down to an attached USB flash drive, and we immediately suspected that the BIOS is trying to boot from that drive.
But how was that possible? None of the partitions in the MBR on that drive was marked bootable, and there wasn’t even a bootable OS on the USB drive. How does the BIOS decide which partition to boot from anyway? Won’t it just look at the MBR partition table and pick the first bootable partition?
No. Apparently not.
As we found out quickly, the BIOS in fact doesn’t really care about the partition table at all. All it does is to list all attached drives, and go through them one by one according to the boot order. If it finds a drive with an MBR signature 0x55aa at offset 0x1fe(see image below in green), it simply begins executing whatever code resides at offset 0x00 of the disk (in red):
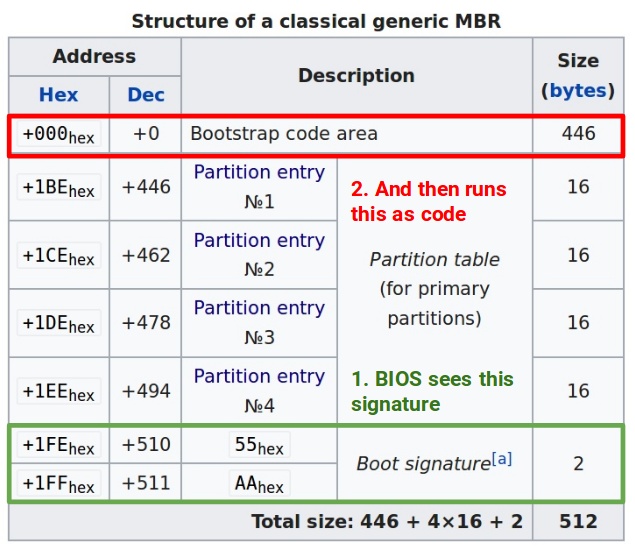
Wow isn’t that surprising? It surely was to me. I thought the BIOS was supposed to be a bit smarter than that. What that means is that really any disk in a boot position before your OS drive can render your computer unbootable if its MBR bootstrap code is not properly programmed, or has been overwritten with garbage.
In our case, we found that certain tools are apparently under the impression that the first few bytes of a disk are “unused”, because they don’t contain the partition table and use this area to store their own metadata.
Since these first 446 bytes do in fact contain the MBR bootstrap code, they are incredibly important to the BIOS during the boot process. If whatever is stored there is not valid x86 code, the BIOS will fail to execute it and drop to the blinking cursor of doom.
2. Reproducing the problem
Now that we knew what the problem is we needed a quick way to reproduce it, so that we could be certain whatever fix we developed would work. The easiest way to do this is by using a virtual machine in KVM/QEMU, a live Linux ISO and a raw disk image with “broken” or non-existent MBR bootstrap code.
First, download a live Linux distro. Something like Tiny Core Linux is more than enough for now:
|
1 2 3 |
# Download Tiny Core Linux curl http://distro.ibiblio.org/tinycorelinux/9.x/x86/release/TinyCore-current.iso \ > TinyCore-current.iso |
Then, we’ll create our “broken” USB disk: To do that, we’ll create a 1 MB sparse file using truncate -s 1M and we’ll create an MBR with a single partition using fdisk. I was a bit lazy here and shortened the fdisk command by using it non-interactively like that; but you can do all of this via the interactive console: o creates the MBR, n–p–1–1 creates the partition, and w writes the changes.
|
1 2 3 4 5 6 7 8 |
# Create a sparse image file (our broken USB disk) truncate -s 1M brokenusb.img # Create an MBR and a partition echo -e "o\nn\np\n1\n1\n\nw\n" | fdisk brokenusb.img # List partitions and MBR info fdisk -l brokenusb.img |
That’s really it to reproduce the problem. If you now attach the Tiny Core ISO as a CD-ROM and the image file as a USB device, you’ll see that KVM won’t boot the Tiny Core live Linux, even though the disk with the MBR has no bootable partitions whatsoever.
|
1 2 3 4 5 6 7 |
# Try to boot from it. # This will fail with a blinking cursor! kvm \ -drive media=cdrom,file=TinyCore-current.iso \ -usb -usbdevice disk:format=raw:brokenusb.img \ -serial stdio -m 1G -cpu host -smp 2 -net none |
3. Interrupt 18h to the rescue!
At first we thought we can’t really do anything about this case. We can detect it now programatically, but what could we possibly do about it?
Well, it turns out that at the very end of the BIOS Boot Specification in Appendix D.2 (yes, I read the entire 46 pages …), it says:
If an O/S is either not present, or otherwise not able to load, execute an INT 18h instruction so that control can be returned to the BIOS. Currently, hard drive boot sectors do this, but floppy diskette boot sectors execute an INT 19h instead of INT 18h. The BIOS Boot Specification defines INT 18h as the recovery vector for failed boot attempts.
Hurray! Exactly what we need. We need to tell the BIOS to try the next disk. The equivalent of “nothing to see here, move along”.
Well, let’s try it then. Let’s write an incredibly complex assembly program containing one instruction int 18h (to call interrupt 18h) and write it to the beginning of the disk:
|
1 2 3 4 5 6 7 8 9 10 11 12 |
# Create the .asm file echo "int 18h" > skipdisk.asm # Compile to x86 code to "skipdisk" output file nasm skipdisk.asm # Note: # If you don't have "nasm" installed, you can simply run # this to produce the same file: echo -en "\xcd\x18" > skipdisk # Write to beginning of the disk dd if=skipdisk of=brokenusb.img conv=notrunc |
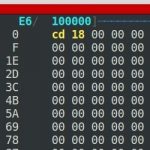
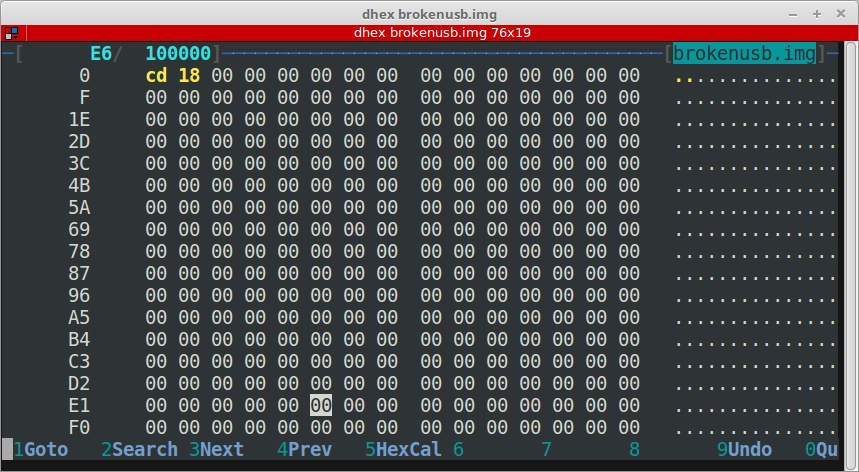
That’s it already. This essentially nukes the bootability of any MBR based disk, which is exactly what we needed. If you look at the disk in a hex editor like dhex, you’ll see the interrupt call at the very beginning as 0xcd18:
Now you can try to boot the VM again, using the exact same parameters, and you’ll see that this time it skips the attached USB disk, and it’ll boot the live Linux instead:
|
1 2 3 4 5 6 |
# Aaannndd let's boot it again. # Booom! It now skips the disk, and boots Tiny Core Linux kvm \ -drive media=cdrom,file=TinyCore-current.iso \ -usb -usbdevice disk:format=raw:brokenusb.img \ -serial stdio -m 1G -cpu host -smp 2 -net none |
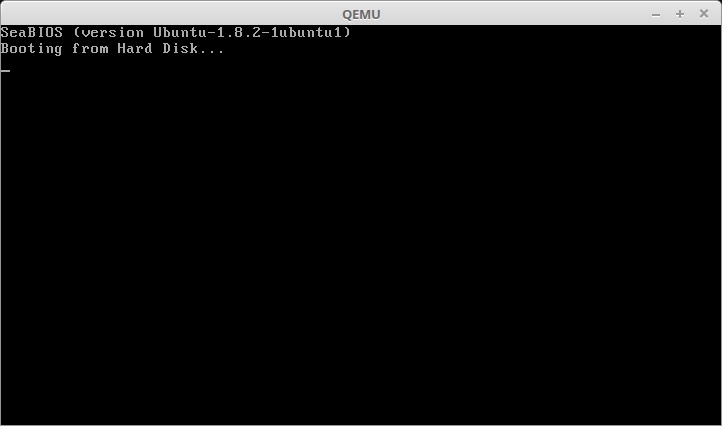
If everything worked as expected, you should see the Tiny Core Linux boot loader screen:

X. Bonus
If you’re like me and the whole world of MBR bootstrap code is new to you, you’ll probably start experimenting with the skipdisk.asm file I provided. If you really want to, you can replace the entire bootstrap code area and do all sorts of things in there.
There is a wonderful wikibook on x86 bootloaders in assembly that I can recommend.
I found a good starting point also Dan Luedtke’s boot loader on Github. I modified his boot loader, ran nasm, and then used dd bs=446 count=1 conv=notrunc to replace the first 446 bytes of my disk. A great learning exercise.
it might also need to wait after the blinking.. my win10 on dok blinked… i waited.. and it started the install after that.. so wait a bit to see if it continues…
Mor.